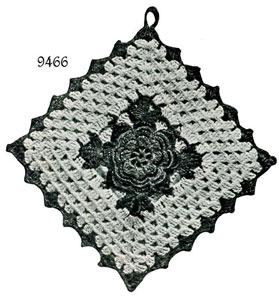
Today I’m going to show you how I made this vintage flower potholder. This FREE crochet pattern will help you make a beautiful and decorative crochet potholder for your home. It would also make a lovely gift.
But before we get started, you should know a little bit about this pattern. It is based on a vintage crochet pattern found in “The Spool Cotton Company” crochet book entitled, “Potholders” (1948).


This pattern has since fallen out of copyright and is now in the public domain. But while the original design is in the public domain, the rewritten instructions and supplementary content on this site are ©Tiffany Bliss Mullins, 2024. All rights reserved. Have questions about this pattern, public domain, or copyright? Visit the FAQ page for answers and resources.
This crochet pattern was originally designed for a size 10 crochet thread and size 7 steel crochet hook (one of those super small crochet hooks for lace). The pattern is written in kind of an old fashioned way that made it more difficult to read for the modern crocheter.
So I decided to re-work the pattern so that we could use a regular size 4 crochet yarn and a regular size G/6/4.25 mm crochet hook. I re-wrote the pattern from the ground up, which required some changes to the design here and there, but I think the end result is very cute!
So now this over 75 year old pattern has new life and we can all have fun making this for our kitchens or for gifts during the holidays.
Let’s get started!
You can watch the video tutorial here (click here for left handed version)
FREE Crochet Pattern Instructions:
Materials Needed:
- worsted weight #4 yarn. 1 ball each of White and Red
- Scraps of Green and Black
- G / 6 / 4.25 mm crochet hook
Flower
- Start the Center:
- With Red yarn, make a magic circle.
- Round 1:
- Chain 5 (counts as a dc + ch-2 space), (dc in the ring, ch 2) 7 times. (You should have 8 spaces.)
- Round 2:
- In each space, work: sc, hdc, 3 dc, hdc, sc. (8 petals total)
- Round 3:
- Chain 4, and turn your work.
- You’re going make a sc into the first ch space of round one between the next 2 petals. Repeat around.
- Round 4:
- In each chain-4 loop, work: sc, hdc, 5 dc, hdc, sc.
- Round 5:
- Chain 4
- You’re going make a sc into the ch space between the next 2 petals. Repeat around. This round is very similar to round 3. we are going to make another row of petals and this row serves as the foundation.
- Round 6:
- In each chain-4 loop, work: sc, hdc, 7 dc, hdc, sc.
- Round 7:
- Repeat Round 5
- Round 8:
- In each chain-4 loop, work: sc, hdc, dc, 7 tr, dc, hdc, sc.
- Fasten off Red.
Leaves
- Round 9 (Add Green):
- Attach Green to the center treble of any petal.
- Chain 4 (counts as a tr), make a 2TrTog (2 triple crochet together cluster in the same stitch). Chain 4, make a 3TrTog in the same stitch, chain 4, make another 3TrTog in the same stitch, chain 7,
- Then repeat around: sc in the center treble of the next petal, chain 7, 3TrTog, ch 4, 3TrTog, ch 4, 3 TrTog, ch 7
- Join and fasten off.
Body
- Round 10 (Add White):
- Attach White to the center leaf of a cluster of three leaves. Each center leaf will be the corner of your potholder.
- Chain 3, 2 dc in the same cluster and chain 1(take note: we are only making one half of the corner here. we will make the other half at the end of the round.)
- Repeat around: 3 dc in the next chain space, chain 1,
- in the next 2 chain spaces make 3 dc, chain 1, and 3 dc, ch 1,
- 3 dc in the next space, chain 1,
- Which bings us to our next corner (cluster of leaves) so we will make 3 dc, ch 1, 3 dc, ch 1 Repeat around until you reach the end
- End with 3 dc in the same space as the start, chain 1, slip stitch into the 3rd chain of the starting chain.
- Round 11:
- Slip stitch across into the next chain space.
- Chain 3, 2 dc in the same space.
- Chain 1, 3 dc in the next space. Repeat to the next corner.
- In each corner space, make 3 dc, chain 3, and 3 dc.
- Continue around. Fasten off after 1 more round of this pattern.
Back
- Start the Center:
- With White, make a magic circle.
- Round 1:
- Chain 3 (counts as dc), make 2 dc in the ring, chain 3, 3 dc in the ring, 3 more times.
- slip stitch into first chain 3 (This forms a square.)
- Round 2:
- Chain 3, dc in each dc across to the corner, in the corner space make 2 dc, chain 3, 2 dc. Repeat around.
- Join with a slip stitch.
- Round 3:
- Repeat Round 2, continuing to increase at the corners.
- Stop when you have completed 8 rounds. Fasten off.
Edging
- Place the Front and Back pieces together, wrong sides facing.
- Attach Red to a corner with the Front facing you.
- Edge Pattern:
- Chain 3 (counts as dc), make 3 dc in the same corner.
- Make the loop for hanging the potholder: Chain 15, slip stitch into the 15th chain from the hook (loop made), make 4 dc in the same space.
(Sc in the next space, in the next space make: 3 dc, chain 3, sc in the 3rd chain from the hook (picot), and 3 dc). Sc in the next space. repeat until you reach the corner. In the corner, make: 4 dc, picot, and 4 dc. Repeat around. - Join and fasten off.


