

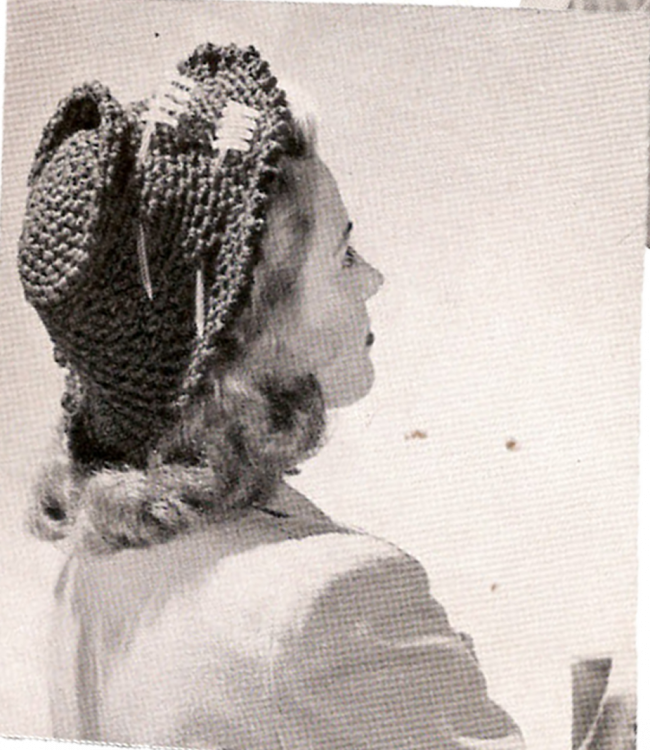
The Tailored Suit Hat is a classic and sophisticated crochet design that has been modernized to suit today’s materials and preferences. With its sleek crown, spiral texture, and elegant picot edging, this hat complements any outfit, from casual to formal. The use of size 10 crochet thread held together provides a substantial yet lightweight structure, making it an ideal accessory for transitional seasons.
This updated version simplifies the original instructions, ensuring clear guidance and straightforward execution for crocheters of all skill levels. The hat’s clean lines and refined style make it a timeless piece, while the addition of light starching or millinery sizing allows you to customize the firmness and shape to your preference. Whether you’re creating it for yourself or as a thoughtful gift, this pattern combines practicality with elegance.
Perfect for crocheters seeking a stylish project with a vintage charm, the Tailored Suit Hat is as rewarding to make as it is to wear. With opportunities for personalization through thread color choices and optional embellishments, this hat is a versatile addition to any wardrobe. Enjoy crafting this beautifully tailored design!
About the Images
To help bring this design to life, we’ve included an AI-generated image of the finished pattern alongside the original vintage illustration. The original image highlights the charm and craftsmanship of the vintage design, while the AI rendering provides a detailed and colorized view of how the completed sweater will look. This combination ensures you have both a historical reference and a modern interpretation to guide you in your crafting journey.
This pattern is transformed, adapted, and expanded from a public domain design originally published in Easy to Make Hats, Scarves and Accessories by The Spool Cotton Company Book No. 192 (1943). While the original design is in the public domain, the rewritten instructions and supplementary content on this site are © Tiffany Bliss Mullins, 2025. All rights reserved. Have questions about this pattern, public domain, or copyright? Visit the FAQ page for answers and resources.
Here’s the rewritten and clarified Tailored Suit Hat No. 1160 crochet pattern for easier understanding, complete with modern yarn suggestions and better-organized instructions.
Tailored Suit Hat No. 1160 Crochet Pattern
Materials
- Original Yarn: J. & P. Coats Knit-Cro-Sheen, 3 balls of any color.
- Modern Equivalent: Size 10 crochet thread (originally J. & P. Coats Knit-Cro-Sheen). If substituting, ensure it’s a mercerized cotton thread.
- Crochet Hook: Steel Crochet Hook No. 6 (approx. 1.8 mm).
- Gauge:
- 2 single crochet (sc) and 2 chain-1 (ch-1) spaces = 1 inch.
- 7 rounds = 1 inch.
Notes
- Thread Preparation: Divide the thread into 6 equal balls. Use 6 strands held together throughout the project to achieve the correct gauge and thickness.
- This pattern is worked in continuous rounds; do not join rounds unless specified.
Instructions
Crown
- Set Up:
- Ch 3 and join with a slip stitch (sl st) to form a ring.
- Round 1:
- Work 7 sc into the ring. Do not join rounds; continue working in a spiral.
- Round 2:
- Ch 1, sc in the next sc. Repeat from * to end of the round.
- Round 3 (Increase Round):
- Ch 1, sc in the next ch-1 space, ch 1; in the next ch-1 space, make (sc, ch 1, sc). This creates an increase.
- Repeat from * around, increasing ch-1 spaces as you go.
- Subsequent Rounds:
- Continue working in this pattern, increasing ch-1 spaces as necessary. Add increases evenly spaced around the circle to maintain a flat, smooth crown until you have 21 ch-1 spaces in total.
- Rounds Without Increases:
- Work the next 3 rounds without adding any increases.
- Increase Round (4 increases):
- Work as established but increase 4 ch-1 spaces evenly spaced in this round.
- Work Without Increases:
- Work 1 inch without any additional increases.
- Increase Round (6 increases):
- Increase 6 ch-1 spaces evenly spaced in this round.
- Repeat the Last Two Steps:
- Work 1 inch without increasing, followed by another round with 6 evenly spaced increases.
- Work Final Rounds:
- Work 6 rounds without increasing.
Picot Edge
- Edging Round:
- Ch 4, sc in the last sc, sc in the next ch-1 space.
- Repeat from * around the edge of the hat.
- Finish:
- Join with a sl st to complete the round.
- Fasten off and weave in all ends.
Shaping and Finishing
- Shape the Hat:
- Pull the hat into the desired shape. If needed, use light starch or millinery sizing to stiffen the hat for better structure. Allow the hat to dry completely before wearing.


