
1940’s Trellis Bag
This charming Trellis Bag pattern brings timeless elegance with its intricate trellis stitch design and practical structure. Originally crafted using size 10 crochet thread, this versatile bag is a vintage treasure, perfect for adding a classic touch to your accessory collection. The included ribbon and decorative button details make it as stylish as it is functional.
The bag features a sturdy base and sides that showcase the trellis pattern, making it an eye-catching piece. With instructions for incorporating buckram and lining, the finished bag is both durable and polished. The use of lightweight or worsted yarn as a substitute offers flexibility, while maintaining the essence of the vintage design.
Whether you’re creating this Trellis Bag as a gift or for personal use, its timeless appeal and elegant details make it a must-try crochet project. With its structured design and tasteful embellishments, this bag is sure to become a cherished favorite!
About the Images
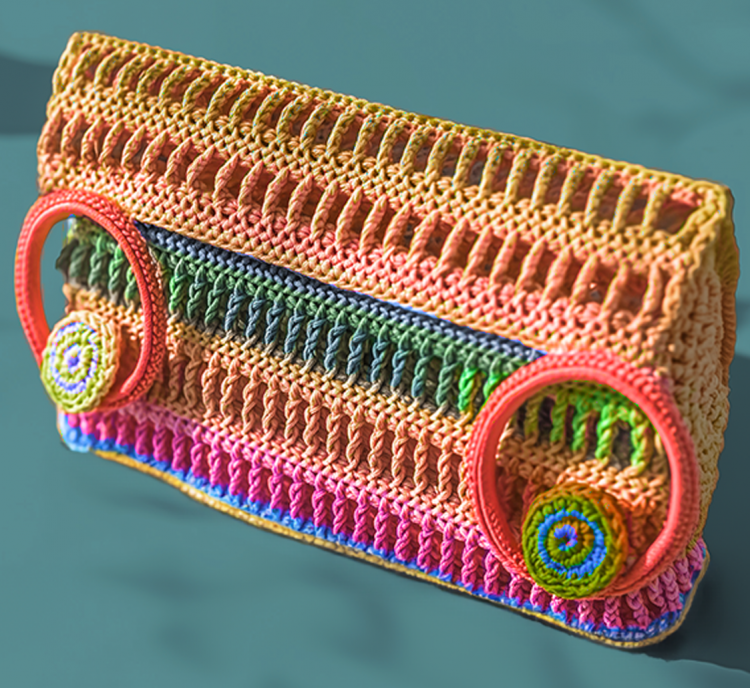
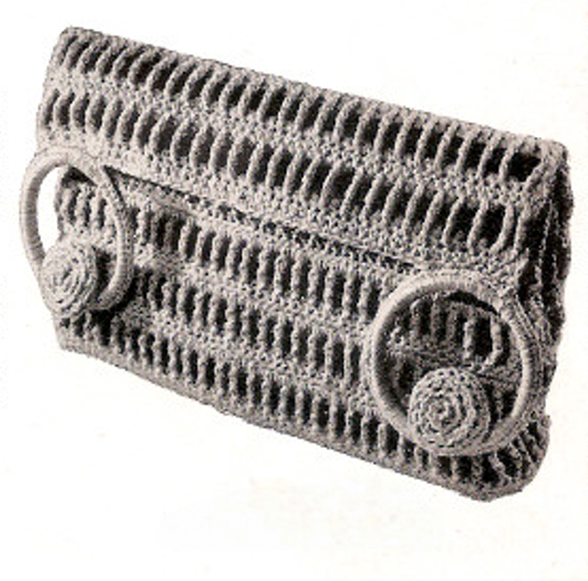
To help bring this design to life, we’ve included an AI-generated image of the finished pattern alongside the original vintage illustration. The original image highlights the charm and craftsmanship of the vintage design, while the AI rendering provides a detailed and colorized view of how the completed sweater will look. This combination ensures you have both a historical reference and a modern interpretation to guide you in your crafting journey.
This pattern is transformed, adapted, and expanded from a public domain design originally published in Easy to Make Hats, Scarves and Accessories by The Spool Cotton Company Book No. 192 (1943). While the original design is in the public domain, the rewritten instructions and supplementary content on this site are © Tiffany Bliss Mullins, 2025. All rights reserved. Have questions about this pattern, public domain, or copyright? Visit the FAQ page for answers and resources.
1940’s Trellis Bag Crochet Pattern
MATERIALS:
- Size 10 crochet thread, 4 balls of Ecru (the pattern originally used J & P Coats Knit-Cro-Sheen)
- Steel crochet hook No. 1
- 4½ yards of red grosgrain ribbon, 1 inch wide
- ⅔ yard of buckram
- ⅔ yard of lining material
- 2 plain plastic bracelets
- 2 large buttons, 1½ inches in diameter
GAUGE:
- 13 sts make 2 inches; 11 rows make 2 inches
NOTES:
- Use triple thread throughout.
- #3 light weight yarn or Worsted weight #4 yarn can be substituted for triple thread; Please check gauge and adjust the hook size as needed.
INSTRUCTIONS:
BASE:
- Starting at one short side, make a chain 12½ inches long.
- Row 1: Sc in 2nd ch from hook and in each ch across. Ch 1, turn.
- Rows 2-8: Sc in each sc across. Ch 1, turn. At the end of Row 8, ch 5 to turn.
TRELLIS PATTERN:
- Row 9 (dtr row): Double treble crochet (dtr) in each sc across. Ch 1, turn.
- Row 10 (sc row): Sc in each dtr across. Ch 5, turn.
- Alternate dtr and sc rows as established until 4 rows of dtr are made. Finish with 3 more rows of sc. Fasten off.
SIDES:
Side 1:
- Attach a triple thread to the 7th sc from the end of the last row of the base. Sc in each sc across to within 6 sts of the end. Ch 1, turn.
- Work over the last row of sc for 14 rows.
- Ch 7 to turn at the end of Row 14, and alternate dtr and sc rows as before until 5 rows of dtr are made. Finish with 3 rows of sc. Fasten off.
Side 2:
- Attach a triple thread to the 7th sc from the end of the base and work sc in each sc to within 6 sts of the other end. Ch 1, turn.
- Work 2 rows of sc.
- Trellis pattern: Work a dtr row, then sc row. Repeat this alternation once more. Finish with 2 rows of sc. Fasten off.
FINISHING:
RIBBON:
Lace the ribbon through the dtr rows, and sew the ends on the wrong side.
LINING:
- Cut a piece of buckram slightly smaller than the crocheted piece and tack it to the wrong side.
- Cut a piece of lining material ½ inch larger on all sides than the crocheted piece. Cover the buckram with the lining, turning the edges under the buckram.
- Sew the lining to the crocheted piece with neat slip stitches.
ASSEMBLY:
- Sew up the sides of the bag neatly on the wrong side.
- Sew the solid part at the bottom of the bag to the lower edges of the sides.
- Make a fold at the top sides of the bag and secure the folds in place.
BUTTONS AND RINGS:
BUTTONS (Make 2):
- Starting at the center, ch 2.
- Round 1: 6 sc in 2nd ch from hook. Work in back loops only from this point.
- Round 2: 2 sc in each sc around.
- Round 3: Sc in next st, 2 sc in next st. Repeat from * around until the piece is large enough to cover the button.
- Work 2 rounds without increasing.
- Shaping: On the next round, decrease every other sc until the piece fits snugly around the button.
- Place the button inside the crocheted piece, and continue decreasing until the piece is closed. Fasten off, leaving an 8-inch tail.
RINGS (Make 2):
- Attach thread to the bracelet and work sc closely around until the bracelet is completely covered. Join and fasten off.
ATTACHMENTS:
- Sew one ring on each side of the flap.
- Sew on buttons to correspond with the rings.
FINISHING TOUCHES:
- Block the bag to measurements.
- Sew ribbon to the inside of the crown for reinforcement.
- Adjust and trim all threads for a neat finish.
Your Trellis Bag is now complete!


