
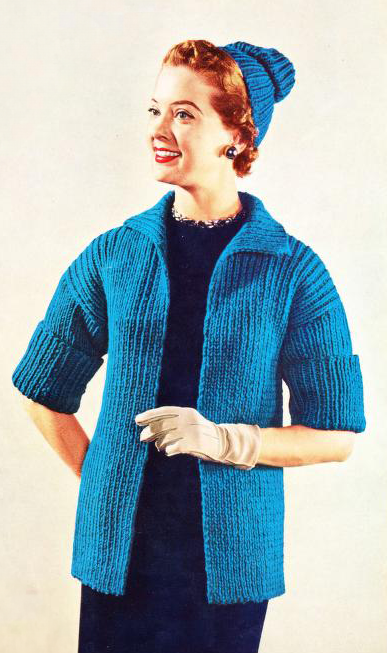
Vintage Finger Tip Length Coat: A Classic Knitwear Masterpiece
The Vintage Finger Tip Length Coat, originally showcased in Knit and Crochet Style Parade by Coats and Clark’s (1954), epitomizes mid-century sophistication with its tailored fit and elegant silhouette. Designed to fall gracefully to the fingertips, this coat offers both warmth and style, making it a timeless wardrobe staple for cooler seasons. The intricate details, such as refined lapels and subtle shaping, ensure this coat stands out as a polished and versatile piece.
Suitable for intermediate knitters, this pattern requires attention to shaping, as well as proficiency in techniques like buttonholes and sleeve construction. While the project might appear challenging at first glance, the step-by-step instructions provide ample guidance, ensuring that even knitters relatively new to garment-making can confidently complete this design. The rewarding process of creating such a functional yet elegant garment makes it an excellent project for those ready to elevate their knitting skills.
This fingertip-length coat is a perfect layering piece, adding a touch of vintage charm to both formal and casual ensembles. Pair it with a sleek dress or tailored trousers for an evening out, or drape it over a classic sweater and jeans for a chic daytime look. Whether you choose to replicate the original 1950s color schemes or opt for a modern twist, this coat will undoubtedly become a statement piece in your handmade wardrobe.
This pattern is transformed, adapted, and expanded from a public domain design originally published in Knit and Crochet Style Parade by Coats and Clark’s in 1954. While the original design is in the public domain, the rewritten instructions and supplementary content on this site are ©Tiffany Bliss Mullins, 2024. All rights reserved. Have questions about this pattern, public domain, or copyright? Visit the FAQ page for answers and resources.
To explore all the FREE patterns from this book, click here.
Materials
- Yarn: Chadwick’s Red Heart Knitting Worsted, 4 Ply
- Skeins Required (Bust Sizes):
- 30: 28 skeins
- 32: 30 skeins
- 34: 33 skeins
- 36: 35 skeins
- 38: 38 skeins
- 40: 40 skeins
- 42: 43 skeins
- Add 4 skeins for an optional matching cap.
- Needles:
- Clark’s O.N.T. Plastic Knitting Pins No. 4 (5 mm)
- Notions:
- Use yarn double throughout.
- Gauge:
- 4 stitches = 1 inch
- 5 rows = 1 inch
Sizes and Finished Measurements
- Sizes (Bust Measurements): 30, 32, 34, 36, 38, 40, 42 inches
- Key Measurements:
- Back Width (across shoulders): 17 (18, 19, 20, 21, 22, 23) inches
- Front Width (each side): 9 (10, 10½, 11½, 12, 12½) inches
- Coat Length (from shoulder to lower edge): 24½ (25, 26, 26½, 27, 27½) inches
- Side Seam Length: 17½ (17¾, 18, 18, 18½, 18½) inches
- Sleeve Length: 11 (13, 14, 14, 14, 14) inches
- Upper Arm Width: 14 (15, 16, 17, 17, 18) inches
Back
- Cast On:
- Using double yarn, cast on:
- 30–32: 69 (73) stitches
- 34–36: 77 (81) stitches
- 38–42: 85 (89, 93) stitches
- Work Ribbing:
- Pattern: k1, p1 ribbing for 17½ inches.
- Mark Armhole Start:
- Place markers at both ends of the row to indicate the start of the armhole.
- Continue in ribbing until the piece measures an additional 7–9 inches, depending on size.
- Shape Shoulders:
- Bind off at the beginning of the next:
- 4 (2, 6, 4, 6, 4, 6) rows: 12 (12, 9, 9, 10, 10, 11) stitches
- Bind off the remaining 21 (23, 23, 23, 25, 25, 27) stitches for the back neck.
Left Front
- Cast On:
- Using double yarn, cast on:
- 30–32: 39 (41) stitches
- 34–36: 43 (45) stitches
- 38–42: 47 (49, 51) stitches
- Work Ribbing:
- Follow ribbing pattern as for Back until piece measures 17½ inches.
- Place a marker to indicate armhole start and work an additional 4–4½ inches.
- Shape Neck:
- Decrease 1 stitch at the neck edge every row for 7 rows until 24 (25, 27, 29, 30, 32, 33) stitches remain.
- Shape Shoulder:
- Bind off at the shoulder edge as follows:
- 12 (12, 9, 9, 10, 10, 11) stitches at the beginning of every other row for 2 (1, 3, 2, 3, 2, 3) rows.
- Bind off remaining stitches.
Right Front
- Work as for Left Front, reversing the shaping and positioning of the neck and shoulder decreases.
Sleeves
- Cast On:
- Using double yarn, cast on:
- 30–32: 48 (52) stitches
- 34–36: 56 (60) stitches
- 38–42: 60 (64, 64) stitches
- Work Ribbing:
- Ribbing pattern (k1, p1) for 6 inches.
- Increase for Sleeve Width:
- Increase 1 stitch at both ends of every:
- 30: 5th row
- 32–34: 7th row
- 36–42: 8th row
- Continue increasing until there are:
- 30–32: 56 (60) stitches
- 34–36: 64 (68) stitches
- 38–42: 72 (72) stitches
- Work Without Increasing:
- Continue ribbing until sleeve measures 11–14 inches, depending on size.
- Bind Off:
- Bind off loosely in ribbing.
Collar
- Pick Up Stitches:
- With right side facing, pick up and knit around the neck edge:
- 30–32: 59 (63) stitches
- 34–36: 65 (73) stitches
- 38–42: 83 (83) stitches
- Work Ribbing:
- Ribbing pattern (k1, p1) for 4¼ inches.
- Bind Off:
- Bind off in ribbing.
Finishing
- Block all pieces to measurements.
- Sew shoulder, side, and sleeve seams.
- Sew in sleeves.
- Press collar through a damp cloth for a polished finish.
This gorgeous fingertip-length coat will knit up faster than you’d imagine and will be a staple in your wardrobe for years to come!
Notes
- This Finger tip Length Coat pairs beautifully with this Quick and Easy Knit Cap for a complete vintage look.


