
Vintage Scoop Neck Sweater: A Timeless and Chic Wardrobe Staple
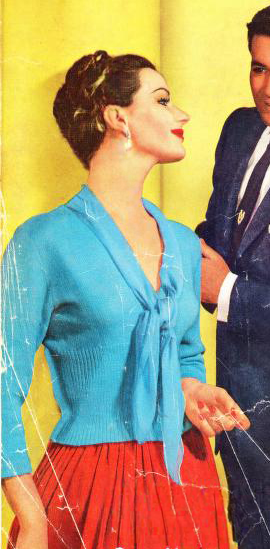
The Vintage Scoop Neck Sweater from Knit and Crochet Style Parade by Coats and Clark’s (1954) is a stunning piece that showcases the elegance and simplicity of mid-century design. With its flattering scoop neckline and tailored fit, this sweater is both versatile and stylish, perfect for any occasion. Whether paired with a pencil skirt for a sophisticated look or worn casually with trousers, it’s a garment that seamlessly blends functionality with timeless charm.
This sweater is suitable for intermediate knitters or crocheters, depending on the version, as it requires attention to shaping and stitch patterns to achieve the perfect fit. The scoop neckline adds a level of detail that requires precision, but the instructions are written clearly, making the process accessible to those willing to take on the challenge. For less experienced crafters, this pattern is an excellent opportunity to practice skills like neckline shaping and achieving consistent tension. With focus and patience, these techniques are straightforward to master.
A perfect addition to any wardrobe, the Vintage Scoop Neck Sweater offers a delightful opportunity to create a wearable work of art. Whether crafted in soft neutrals for a classic look or bold, vibrant hues for a modern twist, this sweater will become a go-to piece. Its timeless design ensures it will remain a favorite for years to come.
This pattern is transformed, adapted, and expanded from a public domain design originally published in Knit and Crochet Style Parade by Coats and Clark’s in 1954. While the original design is in the public domain, the rewritten instructions and supplementary content on this site are ©Tiffany Bliss Mullins, 2024. All rights reserved. Have questions about this pattern, public domain, or copyright? Visit the FAQ page for answers and resources.
To explore all the FREE patterns from this book, click here.
Scoop Neck Sweater with Tie – Free Knitting Pattern
Materials
- Yarn: Chadwick’s Red Heart Orlon “Fashion Yarn,” 3 Ply (1 oz skeins)
- Sizes 32, 34: 8 skeins
- Size 36: 9 skeins
- Sizes 38, 40: 10 skeins
- Needles:
- Pair of No. 1 knitting pins (2.25 mm)
- Pair of No. 2 knitting pins (2.75 mm)
- Gauge: 8 stitches = 1 inch; 10 rows = 1 inch
Back
- Cast On:
- Sizes 32: 128 stitches
- Size 34: 136 stitches
- Size 36: 144 stitches
- Size 38: 152 stitches
- Size 40: 160 stitches
- Work in k1, p1 ribbing for:
- Sizes 32–38: 7 inches
- Size 40: 8 inches
- Switch to No. 2 knitting pins and work in stockinette stitch (k1 row, p1 row) until the piece measures:
- Sizes 32–38: 11 1/2 inches
- Size 40: 13 inches
- Shape Armholes: Follow standard armhole shaping (No. C-259).
- Shape Shoulders: Bind off stitches for the shoulders, leaving:
- Sizes 32, 34: 42 stitches
- Sizes 36, 38: 44 stitches
- Size 40: 48 stitches for the back neck.
Left Front
- Cast On:
- Size 32: 69 stitches
- Size 34: 73 stitches
- Size 36: 77 stitches
- Size 38: 81 stitches
- Size 40: 85 stitches
- Work in k1, p1 ribbing for:
- Sizes 32–38: 7 inches
- Size 40: 8 inches
- Switch to No. 2 knitting pins and work in stockinette stitch until the piece measures:
- Sizes 32–38: 9 1/2 inches
- Size 40: 11 inches
- Shape V-Neck: Decrease 1 stitch at the front edge on the next row, and then every 3rd row until the piece measures:
- Sizes 32–38: 11 1/2 inches
- Size 40: 13 inches
- Shape Armhole: Continue decreasing 1 stitch at the front edge every 3rd row. At the same time:
- Bind off at the armhole edge:
- Sizes 32–36: 9 stitches
- Sizes 38, 40: 10 stitches
- Bind off 2 stitches every other row:
- Sizes 32–36: Once
- Sizes 38, 40: Twice
- Decrease 1 stitch at the armhole edge every other row:
- Sizes 32, 34: 5 times
- Sizes 36–40: 7–8 times
- Final Neck Shaping:
- Continue decreasing 1 stitch at the neck edge every 3rd row until there are:
- Size 32: 31 stitches
- Size 34: 37 stitches
- Size 36: 39 stitches
- Size 38: 44 stitches
- Size 40: 43 stitches
- Then, decrease 1 stitch at the neck edge every 4th row until there are:
- Sizes 32: 29 stitches
- Sizes 34: 31 stitches
- Sizes 36: 32 stitches
- Sizes 38, 40: 34 stitches
- Work without decreasing until the piece measures 6 1/2 (7, 7 1/2, 7 1/2, 8) inches from the first row of armhole shaping.
- Shape Shoulders: Follow the shoulder shaping instructions for No. C-259.
- Button Placement: Mark the positions for 8 buttons on the Left Front:
- Place the first button 1/2 inch up from the lower edge.
- Place the last button 1/2 inch below the first neck-edge decrease.
- Distribute the remaining buttons evenly.
Right Front
Work as for the Left Front, reversing the position of the front band and all shapings.
- Add Buttonholes:
- Create buttonholes 3 stitches in from the front edge:
- On one row, bind off 3 stitches.
- On the next row, cast on 3 stitches to replace them.
Sleeves
- Cast On:
- Sizes 32: 80 stitches
- Size 34: 84 stitches
- Size 36: 88 stitches
- Size 38: 92 stitches
- Size 40: 96 stitches
- Work in stockinette stitch for 7 rows.
- Hemline Row: Knit across the wrong side of the work.
- Continue in stockinette stitch, increasing 1 stitch at both ends of every 8th row until you have:
- Size 32: 96 stitches
- Size 34: 100 stitches
- Size 36: 104 stitches
- Size 38: 108 stitches
- Size 40: 112 stitches
- Work without increasing until the sleeve reaches the desired length.
Right Front Facing
- Cast on 9 stitches using No. 1 knitting pins.
- Work in stockinette stitch, making buttonholes to match those on the Right Front Band.
- Continue until the piece reaches the first neck-edge decrease.
- Shape Facing:
- Next row: Increase 1 stitch in the first stitch, knit 6, knit 2 together.
- Following row: Purl across.
- Repeat these two rows until the piece is long enough to reach the center back of the neck.
- Bind off.
Left Front Facing
- Work as for the Right Front Facing, omitting the buttonholes.
- Reverse the shapings by making the decrease at the beginning and the increase at the end of each knit row.
Finishing
- Block all pieces to the specified measurements.
- Sew the side, shoulder, and sleeve seams. Sew the sleeves into the armholes.
- Sew the facings in place, matching the buttonholes. Sew the short ends of the facings together at the back of the neck.
- Turn under the hem at the sleeve edges and stitch in place.
- Reinforce each buttonhole with buttonhole stitch.
- Sew on buttons to correspond with the buttonholes.


