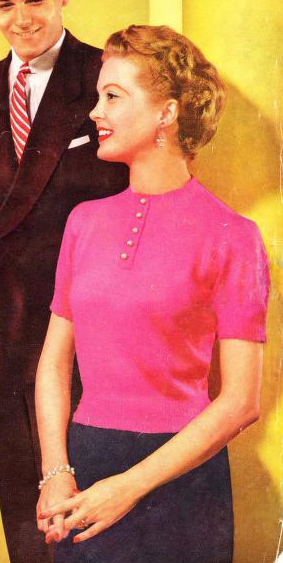
Simple Knit Sweater for All Occasions
Originally featured in Knit and Crochet Style Parade by Coats & Clark’s in 1954, this timeless sweater design is perfect for any setting—whether you’re at home, in town, or enjoying a day in the countryside. Crafted with Chadwick’s Red Heart Orlon “Fashion Yarn,” this project offers a classic silhouette, enhanced by ribbed edges, a cozy stockinette body, and neatly finished button bands trimmed with grosgrain ribbon. This sweater’s straightforward construction makes it an approachable project for knitters, while its versatile style ensures it becomes a wardrobe favorite. Detailed instructions are provided for bust sizes 32 to 40 inches, ensuring a customized fit.
This pattern for a Simple Sweater for All Occasions combines elegance and functionality, making it a versatile addition to any wardrobe. Designed for ease of crafting and comfortable wear, this sweater features ribbed edges, a stockinette stitch body, and neatly finished button bands. Below are the instructions to create this charming sweater, including details for customization by size.
This pattern is transformed, adapted, and expanded from a public domain design originally published in Knit and Crochet Style Parade by Coats and Clark’s in 1954. While the original design is in the public domain, the rewritten instructions and supplementary content on this site are ©Tiffany Bliss Mullins, 2024. All rights reserved. Have questions about this pattern, public domain, or copyright? Visit the FAQ page for answers and resources.
To explore all the FREE patterns from this book, click here.
Materials
- Yarn: CHADWICK’S RED HEART ORLON “FASHION YARN,” 3 Ply, Art. E.265
- Sizes (Bust Measurement):
- 32: 6 skeins
- 34: 7 skeins
- 36: 7 skeins
- 38: 8 skeins
- 40: 9 skeins
- Knitting Needles:
- Clark’s O.N.T. Plastic Knitting Pins, 1 pair No. 1 (2¼ mm)
- 1 pair No. 2 (2¾ mm)
- Notions:
- 5 buttons
- 1½ yards grosgrain ribbon (1-inch wide)
- Gauge: 8 sts = 1 inch; 10 rows = 1 inch
Simple Knit Sweater Instructions
Back
- Cast On: Using No. 1 knitting pins, cast on the following stitches:
- Sizes 12–20: 108 (116, 124, 132, 140) stitches.
- Ribbing: Work in k1, p1 ribbing for 2½ (2½, 3, 3, 3½) inches.
- Stockinette Stitch: Switch to No. 2 knitting pins and work in stockinette stitch (k1 row, p1 row), increasing 1 stitch at both ends of every 7th row until there are:
- Sizes 12–20: 128 (136, 144, 152, 160) stitches.
- Continue Stockinette: Work without increasing until the piece measures 11½ (11½, 11¾, 12, 13) inches in total, ending with a purl row.
- Shape Armholes and Shoulders: Follow the armhole and shoulder shaping instructions from Pattern C-259.
Front
- Work Front: Follow the same instructions as for the Back until the piece measures the same length, ending with a purl row.
- Shape Armholes: Bind off at the beginning of the next 2 rows as follows:
- Sizes 12–20: Bind off 9 (9, 9, 10, 10) stitches, then another 2 stitches at the beginning of the following 2 rows.
- Shape Neck Opening:
- Decrease 1 stitch at the armhole edge on every row until there are 49 (51, 55, 58, 60) stitches.
- Cast on 8 additional stitches for the left front band. Work these 8 stitches in garter stitch, decreasing 1 stitch at the armhole edge until there are 54 (56, 58, 60, 62) stitches.
- Work even until the piece measures 4¼ (4¼, 4½, 4½, 4¾) inches from the first row of armhole shaping.
- Shape Neck: Work across the first 8 stitches, place them on a stitch holder, bind off the next 12 stitches, and finish the row.
- Decrease 1 stitch at the neck edge every other row until there are 29 (31, 32, 34, 34) stitches remaining.
- Work even until the piece measures 6½ (7, 7¼, 7½, 8) inches from the first row of armhole shaping.
- Shape Shoulders: Bind off as for the Back.
Sleeves
- Cast On: Using No. 1 knitting pins, cast on:
- Sizes 12–20: 84 (88, 92, 96, 100) stitches.
- Ribbing: Work in k1, p1 ribbing for 2 inches.
- Stockinette Stitch: Switch to No. 2 knitting pins and work as instructed for Short Sleeves in Pattern C-259.
Neckband
- Setup: Sew shoulder seams. Using No. 1 knitting pins, attach yarn to the Right Front Band and knit across 8 stitches. Pick up and knit evenly around the neck edge, ending with the 8 stitches of the Left Front Band.
- Ribbing: Work in k1, p1 ribbing as follows:
- Row 1: k8, *p1, k1. Repeat from * to last 9 stitches, p1, k8.
- Row 2: k8, *k1, p1. Repeat from * to last 9 stitches, k9.
- Continue Ribbing: Work in ribbing until the neckband measures 1 inch, making a buttonhole in line with the previous buttonholes when the neckband measures ½ inch.
- Bind Off: Bind off loosely, matching the ribbing pattern.
Finishing
- Seams: Sew side and sleeve seams.
- Buttonholes: Work buttonhole stitch around each buttonhole.
- Ribbon: Sew grosgrain ribbon to the outside of the front bands, cutting openings to match the buttonholes.
- Buttons: Sew buttons to correspond with buttonholes.
Block to measurements and enjoy wearing your Simple Sweater for All Occasions!


