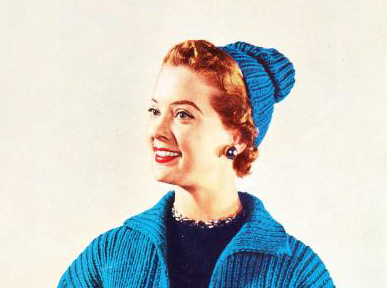
Quick and Easy Vintage Knit Cap Pattern
This charming knit cap is designed to complement the Fingertip Length Coat and uses the same elegant ribbing pattern for a coordinated look. The cap knits up quickly with double yarn and a simple design, making it an excellent project for knitters of all skill levels.
The Vintage Knit Cap, originally published in Knit and Crochet Style Parade by Coats and Clark’s (1954), is a charming and versatile piece that reflects the understated elegance of mid-century design. This snug-fitting cap combines practicality with style, making it an essential accessory for cooler weather. Its simple yet effective design showcases clean lines and a classic silhouette, suitable for both casual and more polished looks.
Perfect for knitters of all skill levels, this pattern is a delightful project that can be completed in just a few sittings. The straightforward construction makes it an excellent choice for beginners eager to practice basic knitting techniques, while the satisfying results will also appeal to seasoned knitters looking for a quick yet rewarding project. The cap’s minimal shaping and timeless style ensure that it will remain a staple in your handmade collection.
This knit cap pairs beautifully with a variety of outfits, from cozy sweaters and scarves to structured coats. Whether created in a neutral tone for everyday wear or a bold color to make a statement, the design’s versatility ensures it will complement any wardrobe. With its enduring appeal, this cap is not only a practical addition to your winter wardrobe but also a thoughtful handmade gift for loved ones.
This pattern is transformed, adapted, and expanded from a public domain design originally published in Knit and Crochet Style Parade by Coats and Clark’s in 1954. While the original design is in the public domain, the rewritten instructions and supplementary content on this site are ©Tiffany Bliss Mullins, 2024. All rights reserved. Have questions about this pattern, public domain, or copyright? Visit the FAQ page for answers and resources.
To explore all the FREE patterns from this book, click here.
Materials
- Yarn: Chadwick’s Red Heart Knitting Worsted, 4 Ply
- Skeins Required: Use 4 skeins from your coat project.
- Needles:
- Clark’s O.N.T. Plastic Knitting Pins No. 4 (5 mm).
- Gauge:
- 4 stitches = 1 inch
- 5 rows = 1 inch
Finished Measurements
- Cap circumference: Approximately 13 inches (before stretching).
- Cap height: Based on ribbing flexibility.
Pattern Instructions
- Cast On:
- Using double yarn and No. 4 needles, cast on 52 stitches.
- Ribbing:
- Work in ribbing pattern as follows:
- Row 1: k1, *p1, k1; repeat from * across.
- Row 2: p1, *k1, p1; repeat from * across.
- Repeat Rows 1 and 2 until the piece measures 13 inches.
- Bind Off:
- Bind off in ribbing.
- Finishing:
- Sew the cast-on edge to the bound-off edge to form the back seam of the cap.
- Arrange and shape the cap as desired, ensuring the ribbing sits comfortably.
Notes
- This cap pairs beautifully with the Fingertip Length Coat for a complete vintage look.
- The ribbing creates a snug, stretchy fit, making it suitable for various head sizes.
This quick-knit cap is a timeless accessory that adds warmth and elegance to any outfit!


