
Vintage Women’s Knit Cardigan with Short Bulky Sleeves: Cozy, Retro Charm
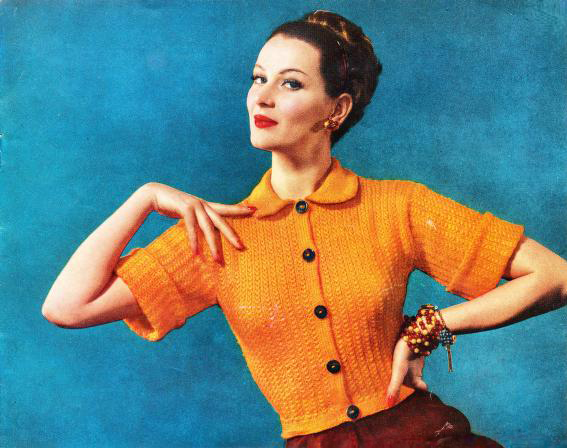
The Vintage Women’s Knit Cardigan with Short Bulky Sleeves from Knit and Crochet Style Parade by Coats and Clark’s (1954) is a delightful blend of practicality and retro flair. Featuring a fitted silhouette and distinctive short, puffy sleeves, this cardigan exudes mid-century charm. It’s a versatile addition to any wardrobe, perfect for layering over a blouse or pairing with a high-waisted skirt for a classic vintage look.
This project is approachable for intermediate knitters but offers enough intrigue to keep more experienced crafters engaged. The short bulky sleeves require careful shaping, but the pattern guides you through the process step by step. For knitters new to creating volume in sleeves, this is an excellent opportunity to learn a rewarding technique. With patience and a willingness to follow the pattern closely, even adventurous beginners can succeed in crafting this timeless piece.
The cardigan’s cozy design and textured sleeves make it a standout garment that is both stylish and functional. Whether you choose a traditional pastel shade or a modern bold hue, this sweater is sure to become a cherished favorite. Its unique details, coupled with its flattering fit, make this cardigan a standout project for any vintage fashion enthusiast.
This pattern is transformed, adapted, and expanded from a public domain design originally published in Knit and Crochet Style Parade by Coats and Clark’s in 1954. While the original design is in the public domain, the rewritten instructions and supplementary content on this site are ©Tiffany Bliss Mullins, 2024. All rights reserved. Have questions about this pattern, public domain, or copyright? Visit the FAQ page for answers and resources.
To explore all the FREE patterns from this book, click here.
Materials
- Yarn: Chadwick’s Red Heart Knitting Worsted, 4 Ply (1 oz skeins)
- Skeins Needed:
- Size 32: 13 skeins
- Size 34: 16 skeins
- Size 36: 19 skeins
- Size 38: 22 skeins
- Size 40: 25 skeins
- Skeins Needed:
- Needles:
- Pair of No. 2 knitting pins (2.75 mm)
- Pair of No. 4 knitting pins (3.5 mm)
- Other Tools:
- Clark’s O.N.T. Plastic Crochet Hook No. 4
- 5 buttons
- 1-inch-wide elastic
- Gauge:
- 5 1/4 stitches = 1 inch
- 7 rows = 1 inch
Back
- Cast On:
- Using No. 2 knitting pins, cast on:
- Size 32: 79 stitches
- Size 34: 85 stitches
- Size 36: 91 stitches
- Size 38: 97 stitches
- Size 40: 103 stitches
- Using No. 2 knitting pins, cast on:
- Hemline Preparation:
- Work in stockinette stitch (k1 row, p1 row) for 1 inch, ending with a knit row.
- On the next row, knit across to form the hemline.
- Body:
- Continue in stockinette stitch until the piece measures 1 inch from the hemline, ending with a purl row.
- Switch to No. 4 knitting pins and work in pattern as follows:
- Row 1: K1, knit the second stitch on the left-hand needle without slipping it off, then knit the first stitch on the left-hand needle and slip both stitches off. Repeat from * to the last stitch, k1.
- Row 2: Purl across.
- Repeat these two rows for the pattern.
- Shaping:
- Increase 1 stitch at both ends of every 10th row until there are:
- Size 32: 87 stitches
- Size 34: 93 stitches
- Size 36: 99 stitches
- Size 38: 105 stitches
- Size 40: 111 stitches
- Increase 1 stitch at both ends of every 10th row until there are:
- Work Without Increasing:
- Continue in pattern until the piece measures 9 inches (Size 32), 9 1/2 inches (Sizes 34 and 36), or 10 inches (Sizes 38 and 40) from the hemline.
- Shape Armholes:
- Bind off 3 stitches (Sizes 32–36) or 4 stitches (Sizes 38 and 40) at the beginning of the next 2 rows.
- Work without decreasing over the remaining stitches until the piece measures 7 inches (Size 32), 7 1/2 inches (Sizes 34 and 36), or 8 inches (Sizes 38 and 40) from the first row of armhole shaping.
- Shape Shoulders:
- Bind off at the beginning of the next 6 rows:
- Size 32: 10 stitches
- Size 34: 11 stitches
- Size 36: 11 stitches
- Size 38: 12 stitches
- Size 40: 12 stitches
- For sizes 34 and 38 only, bind off at the beginning of 2 additional rows:
- Size 34: 12 stitches
- Size 38: 13 stitches
- Place the remaining stitches on a holder for finishing.
- Bind off at the beginning of the next 6 rows:
Left Front
- Cast On:
- Using No. 2 knitting pins, cast on:
- Size 32: 44 stitches
- Size 34: 47 stitches
- Size 36: 50 stitches
- Size 38: 53 stitches
- Size 40: 56 stitches
- Using No. 2 knitting pins, cast on:
- Hemline Preparation:
- Work in stockinette stitch for 1 inch, ending with a knit row.
- On the next row, knit across to form the hemline.
- Body:
- Continue in stockinette stitch until the piece measures 1 inch from the hemline, ending with a purl row.
- Switch to No. 4 knitting pins and begin working in the established pattern (as for Back).
- Increase at Side Edge:
- Increase 1 stitch at the side edge every 10th row until there are:
- Size 32: 52 stitches
- Size 34: 55 stitches
- Size 36: 58 stitches
- Size 38: 61 stitches
- Size 40: 64 stitches
- Increase 1 stitch at the side edge every 10th row until there are:
- Shaping:
- Work without increasing until the piece measures 9 inches (Size 32), 9 1/2 inches (Sizes 34 and 36), or 10 inches (Sizes 38 and 40) from the hemline.
- Shape Armhole:
- Bind off 3 stitches (Sizes 32–36) or 4 stitches (Sizes 38 and 40) at the beginning of the next row.
- Work without decreasing over the remaining stitches until the piece measures 5 inches (Size 32), 5 1/2 inches (Sizes 34 and 36), or 6 inches (Sizes 38 and 40) from the first row of armhole shaping.
- Shape Neck:
- Bind off 15 stitches at the front edge on the next row.
- Decrease 1 stitch at the neck edge every other row until there remain:
- Size 32: 30 stitches
- Size 34: 33 stitches
- Size 36: 34 stitches
- Size 38: 36 stitches
- Size 40: 37 stitches
- Shape Shoulder:
- Bind off at the beginning of the next 3 rows:
- Size 32: 10 stitches
- Size 34: 11 stitches
- Size 36: 11 stitches
- Size 38: 12 stitches
- Size 40: 12 stitches
- Bind off at the beginning of the next 3 rows:
Right Front
- Work as for Left Front, reversing the position of the button band and shapings.
- Buttonholes:
- Place buttonholes opposite the pin marks from the Left Front.
- To make a buttonhole:
- Row 1 (Right Side): With the right side of the work facing, k1, bind off 2 stitches, k1, sl1, k1, bind off 2 stitches, k1, then continue in the pattern to the end of the row.
- Row 2 (Wrong Side): Purl across, casting on 2 stitches to replace each set of 2 stitches that were bound off in the previous row.
Sleeves
- Cast On:
- Using No. 4 knitting pins, cast on:
- Size 32: 73 stitches
- Size 34: 76 stitches
- Size 36: 79 stitches
- Size 38: 82 stitches
- Size 40: 85 stitches
- Using No. 4 knitting pins, cast on:
- Body of Sleeve:
- Work in the established pattern (as for Back) until the sleeve measures 3 inches (Sizes 32–34) or 3 1/2 inches (Sizes 36–40), ending with a purl row.
- Hemline:
- On the next row (right side of work), purl across to form the hemline.
- Reverse Work:
- Starting with the first pattern row, continue working in the pattern until the sleeve measures:
- Size 32: 5 inches
- Size 34: 5 1/2 inches
- Size 36: 6 inches
- Size 38: 6 inches
- Size 40: 6 3/4 inches
- Starting with the first pattern row, continue working in the pattern until the sleeve measures:
- Shape the Sleeve Top:
- Bind off 3 stitches (Sizes 32–36) or 4 stitches (Sizes 38–40) at the beginning of the next 2 rows.
- Decrease 1 stitch at both ends of every 4th row until:
- Size 32: 59 stitches remain
- Size 34: 62 stitches remain
- Size 36: 63 stitches remain
- Size 38: 66 stitches remain
- Size 40: 69 stitches remain
- Then decrease 1 stitch at both ends of every other row until:
- Size 32: 58 stitches remain
- Size 34: 59 stitches remain
- Size 36: 58 stitches remain
- Size 38: 59 stitches remain
- Bind off 2 stitches at the beginning of the next 12 rows.
- Bind Off: Bind off the remaining stitches:
- Size 32: 35 stitches
- Size 34: 34 stitches
- Size 36: 35 stitches
- Size 38: 34 stitches
- Size 40: 35 stitches
Collar
- Cast On: Using No. 4 knitting pins, cast on:
- Size 32–34: 70 stitches
- Size 36–38: 79 stitches
- Size 40: 86 stitches
- Stockinette Stitch:
- Work in stockinette stitch (k1 row, p1 row) for 4 rows.
- Increase Row:
- Knit the first 3 (3, 4, 4, 4) stitches, *knit 6, increase 1 stitch in the next stitch; repeat from * across, ending with 3 (3, 4, 4, 4) stitches.
- The total number of stitches on the needle is now:
- Size 32–34: 80 stitches
- Size 36–38: 90 stitches
- Size 40: 98 stitches
- Continue Without Increasing:
- Work without increasing until the collar measures 1 inch.
- Shape Collar:
- Decrease 1 stitch at both ends of every other row 4 times.
- Bind off 2 stitches at the beginning of the next 4 rows.
- Bind off the remaining:
- Size 32–34: 64 stitches
- Size 36–38: 74 stitches
- Size 40: 82 stitches
Finishing
- Block: Block all pieces to the specified measurements.
- Seams: Sew the side, shoulder, and sleeve seams. Set the sleeves into the armholes.
- Hem:
- Turn under the hem at the lower edge of the body and sleeves and stitch in place to form a casing.
- Insert the elastic into the casing at the waist and stitch the ends of the elastic securely in place.
- Collar:
- Sew the collar to the neck edge, leaving 1/4 inch free at each front edge.
- Cuffs:
- Turn back the cuff edge of each sleeve. Using a crochet hook, work a row of single crochet along the outer edge of the collar and the cuff edges of the sleeves.
- Turn under the single crochet row and stitch in place for a neat finish.
- Buttonholes: Reinforce buttonholes with buttonhole stitch.
- Buttons: Sew on buttons to correspond with buttonholes.


