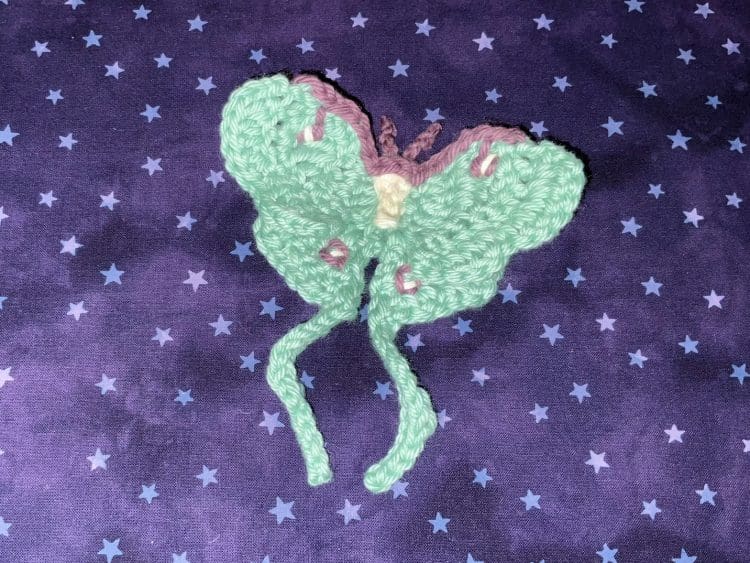
Today’s free crochet pattern is a luna moth applique. You can attach this beautiful crochet piece to hats, headbands, purses or anything you want really. It would also make a lovely brooch if you just stick a pin on the back.
Some notes about this pattern:
- The wings of the butterfly are made as two separate pieces. The top two wings are made starting with a magic circle (or chain 4 and slip stitch if you prefer that method). Then we start a separate magic circle for the bottom two wings and connect them later. I did this because if you look at a photo of a real luna moth, their bottom wings are sort of behind the top wings (or at least that’s how they appear). If you were to make all the wings into one magic circle, you won’t get the same affect.
- The antennas do not require any wires. They stick up all on their own, because we’re going to simply knot them until they are the length we want. I knotted them 6 times to get this look.
- The details on the wings are sort of embroidered on….but I only used the same yarn as the body so that additional supplies weren’t complicating this project.
- I try to write my patterns as simply as possible so that everyone, even beginners, can follow along.
Phew! Okay I think that’s everything. Now let’s make this really cute luna moth!
For this project you will need:
- #4 worsted weight yarn in light green, white and purple. You will only use a little of each, so if you have these colors in your stash, this is a great stash buster project
- A crochet hook. I used an G/6 4.25 mm hook.
- Scissors
- Yarn needle for weaving in the yarn tails.
Pattern Key (all US terms):
MC – Magic Circle
DC – Double Crochet
SC – Single Crochet
Ch – Chain
Tr – Triple Crochet
SS – Slip Stitch
Free Crochet Luna Moth Pattern
Top Wings (light green yarn)
Round 1
- Make a magic circle (or chain four and slip stitch into first loop to make a circle). Make sure to leave a long yarn tail for later.
- Chain 3 (counts as first DC)
- Make 3 DC into the circle. Turn.
Round 2
- Chain 2 and SC into that same very first stitch that the chain 2 comes out of.
- DC into the next 2 stitches
- 2 DC into the the last stitch (which is the chain space aka the chain 3 from the previous row). Turn.
Round 3
- Chain 4 and TR into that same very first stitch that the chain 4 comes out of.
- 2 TR in the next stitch.
- DC in the next stitch.
- SC in the next stitch.
- 2 SC in the last stitch (which is the chain space aka the chain 2 from the previous row). Turn.
Round 4
- Chain 2
- SC in the next 4 stitches. (Please note that this time we are not putting a SC into the same space that the CH 2 comes out of, this time we are working in the stitch that comes next)
- DC in the next 4 stitches (including chain space). Turn.
Round 5
- Chain 3.
- DC in the next stitch (again, not the same stitch that the chain 3 comes out of, the next one over).
- 2 DC in the next stitch.
- 2 DC in the next stitch again (this is not a typo).
- SC in the next stitch.
- DC in the next 3 stitches.
- 2 SC into the chain space then fasten off by chaining one and pulling the yarn through. Make sure to leave a long yarn tail for later.
For the second wing, simply make loop into the magic circle and start making the second wing starting from the beginning. When your finished close the magic circle.
Now, if one wing is upside down, just flip it right side up, lol. That’s what I did on one of my wing sets and you can’t tell, because it doesn’t matter. We’re going to be sewing them together and putting a luna moth body over that part anyway. It doesn’t add bulk, and it doesn’t make one bit of difference.
Bottom Wings (light green yarn)
Round 1
- Make a magic circle (or chain four and slip stitch into first loop to make a circle). Make sure to leave a long yarn tail for later.
- Chain 3 (counts as first DC)
- Make 3 DC into the circle. Turn.
Round 2
- Chain 3 and DC into that same very first stitch that the chain 3 comes out of.
- 2 DC into the next stitch.
- 2 DC into the next stitch again (this is not a typo)
- 2 DC into the the last stitch (which is the chain space aka the chain 3 from the previous row). Turn.
Round 3
- Chain 2
- Chain 2 and SC into that same very first stitch that the chain 2 comes out of.
- SC into the next 7 stitches (including chain space). Turn.
Round 4
- Chain one
- SC in the next stitch (Please note that this time we are not putting a SC into the same space that the CH 1 comes out of, this time we are working in the stitch that comes next).
- DC in the next stitch.
- SC in the next stitch.
- 2 DC in the next stitch.
- 2 SC in the next stitch.
- SC in the next stitch.
- DC in the next stitch.
- SC in the next 2 stitches.
- Chain 15 (we’re making that long tail that comes of the bottom wing now).
- Now we’re going to be working our way back up the tail. So, in the second stitch from the hook you’re going to slip stitch into the chain 15.
- SS into the next 3 chains.
- SC into the next chain.
- HDC in the next 2 stitches.
- SC in the next 2 stitches.
- SS in the next 3 stitches.
- SC in the next stitch.
- HDC in the next stitch.
- SC into the first stitch that comes next on the bottom wing. Then you’re going to SS up the side of the wing. When you reach the end chain one and fasten off.
For the second bottom wing, simply make loop into the magic circle and start making the second wing starting from the beginning. When your finished close the magic circle.
Luna Moth Body (white or off white yarn)
- Chain 7
- Working back up the chain SS in the 2nd chain from the hook.
- SS into the next stitch (not a typo)
- SC in the next stitch.
- HDC into the next 2 stitches (this will be the head). Fasten off.
Making the Antennas
- On one side of the head loop in a piece of purple yarn about 6-7 inches long and tie 6 times. Then cut the yarn close to the last knot.
- Repeat on the other side of the head. They stand up quite nicely on their own. No wires needed!
Constructing the Luna Moth
- Using light green yarn and a yarn needle sew the two wing pieces together in the middle. It helps to look at a photo of a luna moth. You’ll see that the bottom wings should hang slightly below the top ones.
- Once your wings are connected, sew the body of the luna moth in the center using the same white yarn you used for the body.
The Purple at the top of the wings and Embroidery
- Starting at about 1/2 way from the edge of the right wing, loop in purple yarn and SS across the top. Once you reach the body, chain 2 and SS across until 1/2 way from the edge of the left wing. Fasten off.
- For the embroidered markings on the top wings, I used purple yarn to make two stitches down from the wing then I made a small box for the luna moth “eye”. Then I Made a stitch of white in the box.
- On the bottom wings I made a box shape with the purple and one white stitch on the bottom inside each.
And that’s it! Crochet luna moths are fun and easy to make. Now you can attach your applique to any of your fabulous crochet projects!


