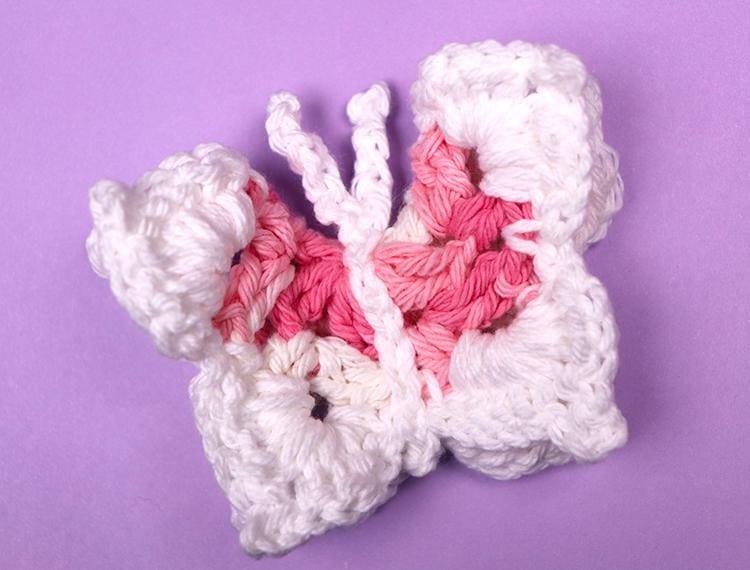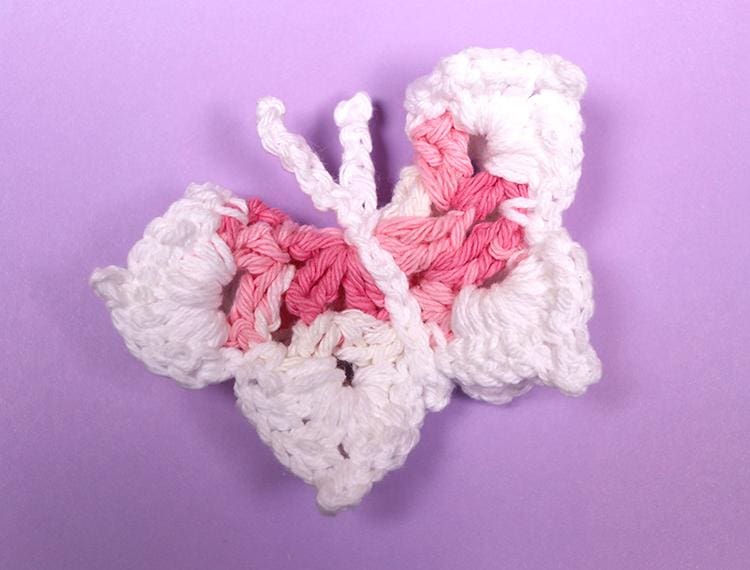
This is a an easy beginner crochet butterfly project. I love this pattern because you can use it as an applique on blankets, hats or scarves and it has a 3D effect. It almost looks as if the wings are flapping off the crocheted item. Of course, this butterfly doesn’t have to be an applique. It’s also works as a stand alone butterfly that can be used as a toy for a little one in your life.
We wrote the instructions for this pattern with the beginner crochet artist in mind, so the instructions are easy to follow and understand.
Let’s talk about the pattern! This butterfly is made in a circular fashion. It contains three layers to the circle called rounds, because you go “round” the circle three times.
As you work you’ll notice that your making a snowflake/star/flower shape. The edges will become somewhat frilly in the last round. That’s okay. We’re going to fold the whole frilly circle in half at the end. It will all work out and become cute as a button.
The instructions below use a chain 6 instead of a magic circle. But if you’d prefer to make a magic circle, you can do that instead.
Disclaimer: Some of the links below are affiliate links. This means that, at zero cost to you, I will earn an affiliate commission if you click through the link and finalize a purchase. Please see my Affiliate Disclosure page for more details.
For this project you will need:
Yarn – In the example I used Sugar and Cream Strawberry Ombres yarn and Peaches and Cream white cotton yarn.
Crochet Hook – I used an H/8 5 mm hook.
Yarn needle
Scissors
Instructions:
Make a Circle (if you make a magic circle instead, you can skip this step)
- Make a slip knot and chain 6.
- Insert you hook into the first chain and slip knot to create a circle.
- Make a slip stitch inside of the circle.
Round 1
- Chain 3. (this will count as one double crochet)
- Double crochet into the circle (this will count as your second double crochet for this pattern) Chain 2
- Make 2 double crochets and chain 2. Repeat 6 more times. At the end you should have 16 double crochets with chain spaces in between. Chain spaces are the gaps created when you chain instead of double crochet. Your work will look a little bit like a wagon wheel. Remember to chain 2 after your last set of double crochets.
- Slip stitch into the first chain 3 you made (this is the chain 3 we made at the very beginning of the circle that we said counts as a double crochet). You’ll notice that there are now 8 chain spaces. We’re going to slip stitch into the first chain space. This completes the first round.
Round 2
- If you want to change the color so that your butterfly is multi-colored this is one point where you can do it. There are different points in this project where color changes can be made, I’ll let you know where it works out best as we go. In my example I didn’t change colors at this point, I waited until the next round. So I’ll include the instructions for changing colors when we reach that point.
- Chain 3 (again this counts as your first double crochet for this round).
- Double crochet into the chain 3 space and chain 3.
- Make 2 more double crochets into the chain space below and chain 1.
- In the next chain space make 2 double crochets, chain 3, make 2 more double crochets and chain 1. Repeat this 30 more times until you have 32 double crochets. There should be a total of 4 double crochets in each chain space with a chain 3 between them. Remember to chain 1 after your last double crochet.
- Slip stitch into the first chain of this round and make another slip stitch on top of that. This completes the second round.
Round 3
- The second round has 8 chain 3 spaces. Don’t get confused with all the spaces you’ve created so far. It’s easy to see where the chain spaces are on the last round because they stick out the most. Those are the chain spaces you’ll be working in for this final round.
- This is the point in my example where I changed colors. Here’s how I did it: I tied off my yarn and cut my pink ombre yarn (leaving a tail). Folded my white color yarn in half, inserted the hook into the pink chain loop and pulled the yarn through. I tied once in the back where the two yarn pieces met and continued on with the project. On small projects, I don’t work tails into my project until I’m finished. So I just left the tails in the back for now.
- Now in the first chain 3 space, make 5 double crochets.
- To make a cute little point at the end of the butterfly we’re going to Chain 3 and insert your hook into the last stitch of your last double crochet. This is at the base of the chain 3. Make 1 single crochet.
- Then in the same chain three space, make 5 more double crochets.
- Repeat steps 3-6 until you have 80 double crochets in this round. In other words, you’ll have 10 double crochets in each chain space. Your work should look like an 8-pointed star or flower doily and it may be a little frilly. It probably won’t lay flat. That’s okay, that’s to be expected.
- Slip stitch at the base of your first double crochet in this round and slip stitch again.
- Fold your shape in half so that all the points align. Your hook should be in your last slip stitch. Now that the butterfly is folded in half you should have the bottom of other half right in front of your hook. Slip stitch into that space so that the two sides are joined.
The body of the butterfly (If you want to change the color of the butterfly body, you can follow the instructions outlined in round 3 section 2)
- Chain 14 and wrap the chain around both sides of the butterfly down the center. Slip stitch into the space between the two halves of the butterfly then make another slip stitch. Now we’re going to cut our yarn leaving a long yarn tail. In crochet terminology when you cut your yarn, this is called fastening off. You’ll want to leave a tail long enough that you can weave the yarn into your butterfly with a yarn needle. I left about 6 inches just so I could weave comfortably.
Butterfly Antennae
- Chain 6 in any color you’d like. I used the white color in my example. Make sure to leave at least a 3 inch tail, because we’re going to work this tail into the body of the butterfly to give the piece structure.
- With the chain of 6 still on your hook insert your hook in the top chain of the chain 14 we made for the butterfly’s body and slip stitch.
- Now chain 7. Yes, we’re chaining one more than the 6 we started with. This is because once we cut the yarn we’re going to pull the yarn and that 7th chain will kind of disappear. Just like we have on the other side. Trust me, this is how it works best.
- Cut your yarn and make sure to leave a tail long enough to work into the body of the butterfly and pull your yarn taut.
- Work the end of each butterfly antennae into their individual chain and then down into the chain used for the body. Like I said before, this will help give your antennae structure. If you don’t work the ends into not only the antennae chain but also the chain of the body, your antennae will kind of flop around instead of stick up nicely.
Finishing up
- Weave all of your yarn tails into your work to hide them.
- Now you can sew this on to a blanket, hat, sweater, or anything you’d like. You can also enjoy this crocheted butterfly just as it is. It’s so adorable when finished.