I looked everywhere online for a reindeer crochet stitch pattern. I couldn’t find a single one! Not on etsy, pinterest or Google. I found appliques, granny squares and reindeer crochet lace. But not a single crochet reindeer stitch pattern.
So I decided to make my own and then post it here on my website for you.
I plan on making a few projects with this reindeer crochet stitch, so keep an eye on my website and my YouTube channel for upcoming free patterns featuring this stitch.
For this crochet pattern you will need:
- Three colors of yarn.
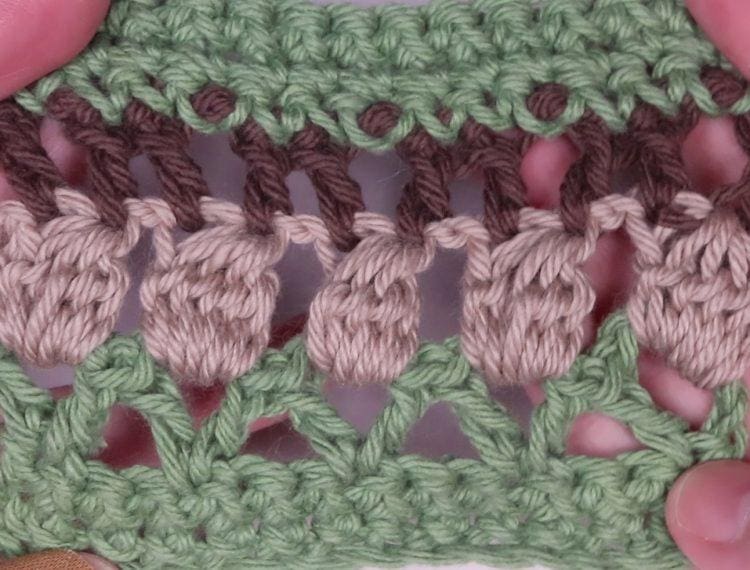
- I used Peaches and Cream yarn in the color “Rosemary” for the main color. It’s a lovely shade of green.
- For the deer heads I used Mainstay’s 100% cotton yarn in the color “Brownstone” which is a really pretty beige color.
- And for the antlers I used Peaches and Cream in “Dark Taupe” which is a rich shade of brown.
- Scissors
- Crochet hook
- I used a siz H/8 5.00 mm
- Yarn needle
Reindeer Crochet Stitch Instructions
- Make a chain in multiples of 3+2. You can make it as long as you want as long as the chain has a multiple of 3 and then you’ll add 2 extra chains to that multiple of 3. For my sample project I made a chain of 12 stitches plus 2.
- Once you’ve made your chain, single crochet into the second chain from the hook. We do not count the loop on the hook as a chain. Then single crochet into every chain down the row. When you get to the end, chain one and turn your work. The total number of single crochet chains will be your original chain number (which was a multiple of 3) plus 1. So, since my sample project chain started with 12 chains I’ll add one and my single crochet chain is made up of 13 chains in a row.
- Repeat step 2 until you have as many single crochet (base) rows as you want. When you get to the last chain on the last row do not chain 1, instead we’re going to make a special row of latice work stitches for your reindeer heads to sit on. Instead of chaining one, your going to chain 5 and turn your work.
- Double crochet in the very first stitch.
- Skip two stitches and double crochet in the third stitch. Chain 2 and then double crochet in that same third stitch. We’re going to continue this pattern until you reach the end. The pattern is: skip two stitches, double crochet in the third stitch, chain 2, double crochet in the same third stitch. You’ll notice we’re making little triangle shapes. It’s important to note that you do not double crochet between making the triangles (when we are skipping two chains).
- When you get to the end of the row, loop in your deer head color and chain 3. Turn your work.
- Double crochet 5 together (DC5Tog) in every triangle (or every other hole) starting with the first one. If you aren’t familiar with the DC5Tog stitch it’s basically like making 5 double crochets halfway, then once you have 6 loops on your hook you finish all 5 double crochets together in one full swoosh. Chain 2 after every DC5Tog. These will be our deer heads.
- When you get to the last deer head do not complete the swoosh part of the DC5Tog. Instead loop in the antler color and chain 5 then turn your work.
- Double crochet into that first stitch.
- If you look at the top of your deer heads you will see that there are 2 stitches on each head. One might be smaller and one might be longer. You’re going to double crochet in the first stitch then chain 2.
- Move to the next stitch and double crochet. But do not chain 2. Repeat until you reach the end of the row.
- At the end of the row loop in your original main color and chain one. Then turn your work.
- Single crochet in the first space between the deer antlers (not the first stitch)
- Single crochet into every stitch above each antler and above every deer head. But not between individual deer. Your stitch pattern will be: single crochet in space above head on deer A, on deer antler of deer A, on deer antler of deer B, on space above head on deer b, on deer antler on deer b, on deer antler on deer c…etc.
- You can continue making as many rows of single crochet as you want and you’ll notice that you now have your original number of crochet stitches (multiple of 3) plus 1.
Please see the video for a visual step by step tutorial of the reindeer crochet stitch by Tiffany Bliss. If you’d like to watch the left handed version instead, click here.


