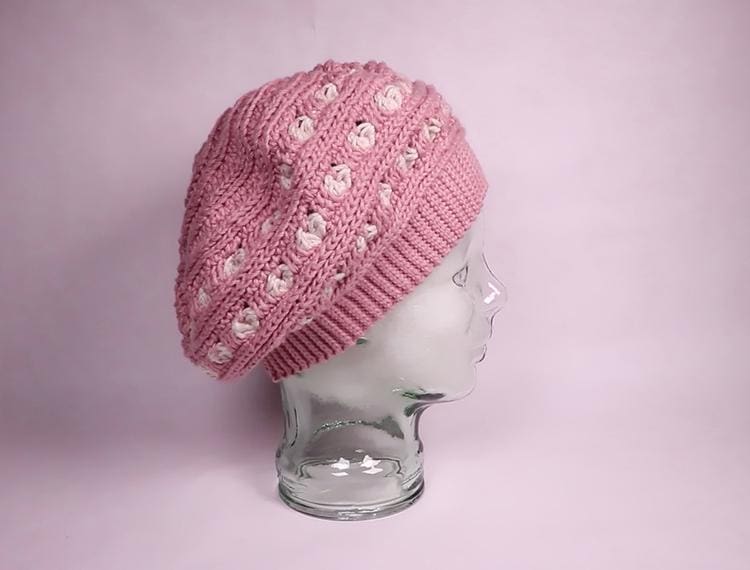
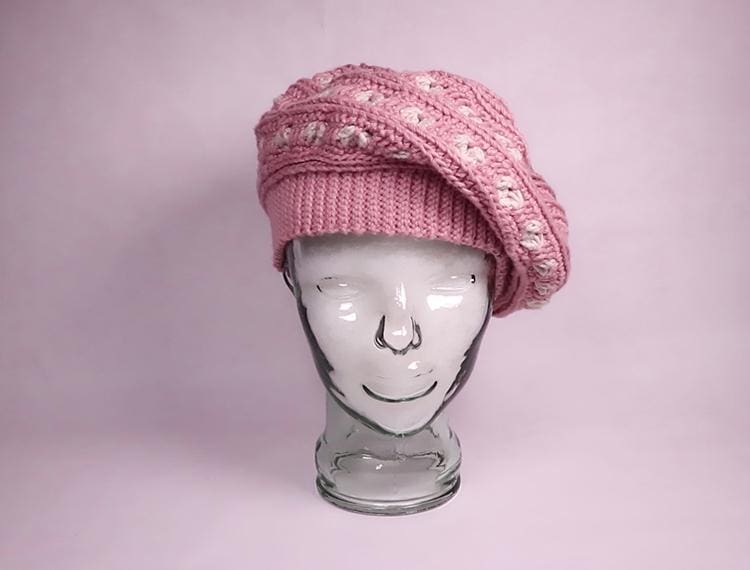
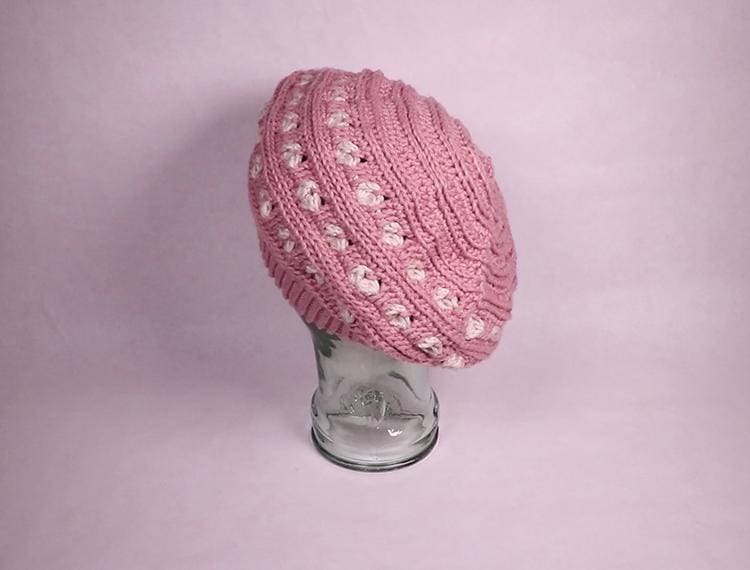
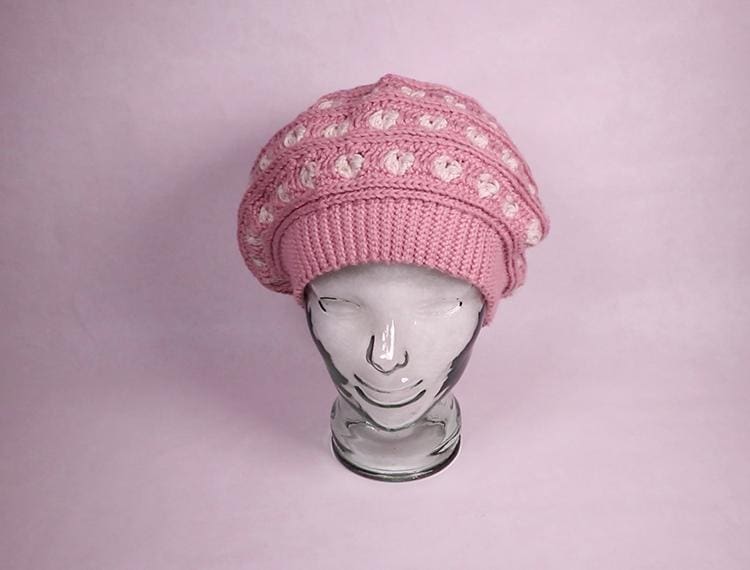
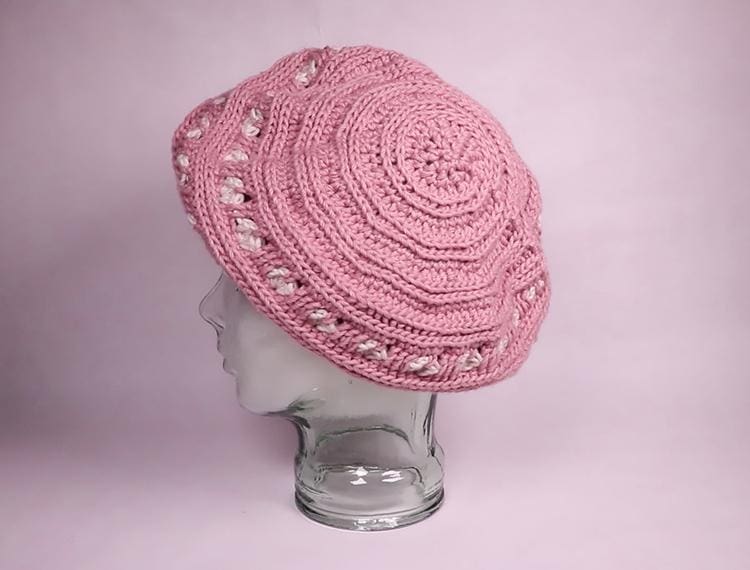
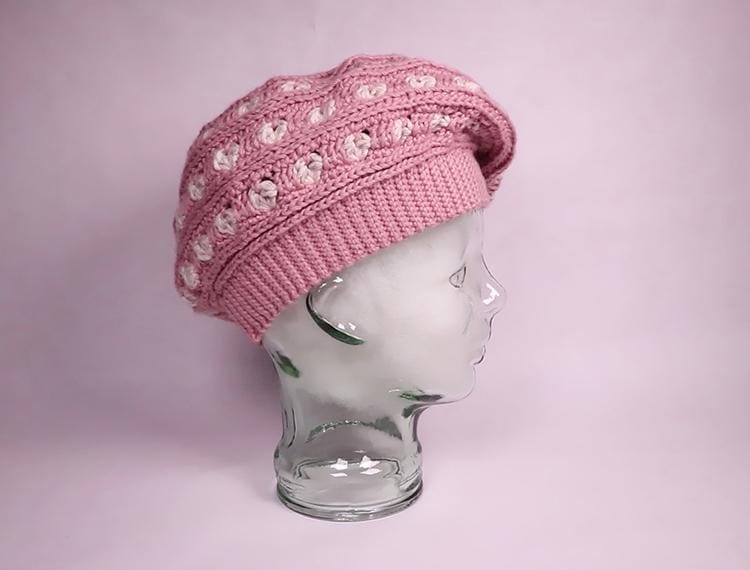
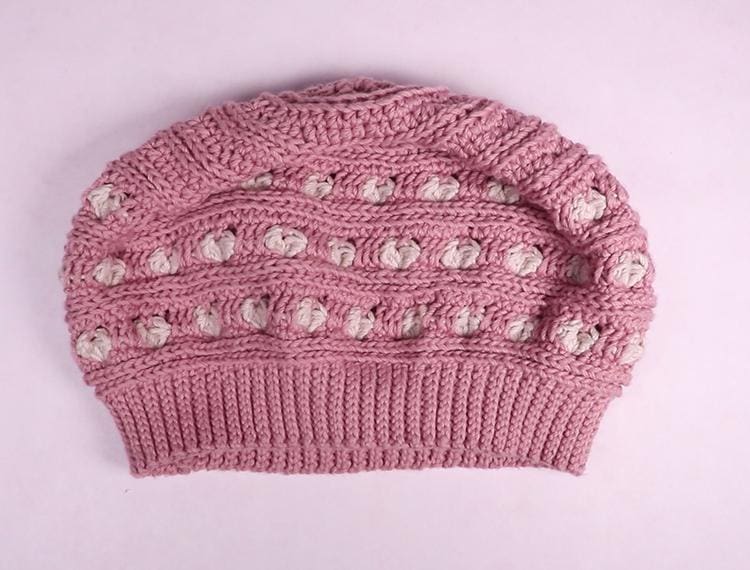
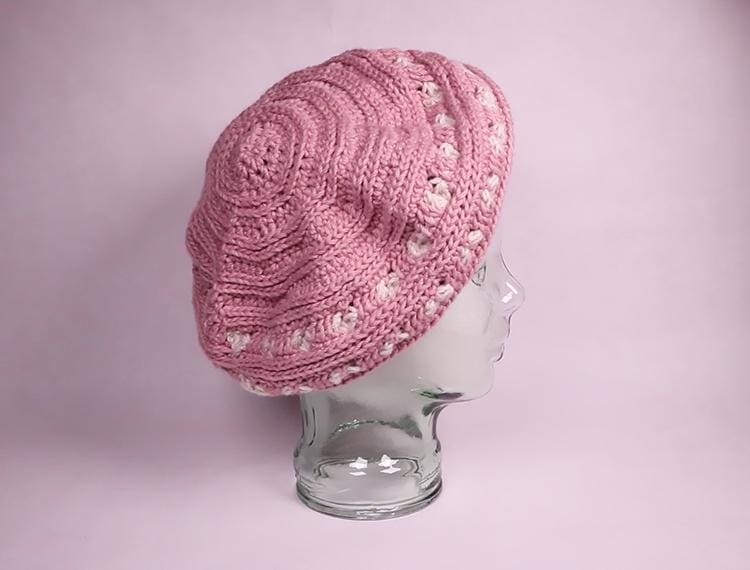
Today we’re making a crochet slouchy hat in pink and white, called “Happy Hearts” just in time for Valentine’s day. I love that it can be worn in different ways to look like an oversized beret or like a traditional slouchy hat.
This pattern is worked in the round after the initial ribbed brim. It’s crocheted using several different stitches and techniques so it’s probably not an absolute beginner pattern, but its also not a difficult one.
Okay, let’s get started!
For this project you will need:
- 2 skeins of pink yarn. I used “I Love This Cotton” brand yarn in the color “Rosy”.
- 1 skein of off white yarn. I used “I Love This Cotton” brand yarn in the color “Parchment”.
- A crochet hook. I used an G/6 4.25 mm hook.
- Scissors
- Yarn needle for weaving in the yarn tails.
Crochet stitches used in this pattern (US terms):
Ss – Slip stitch
Ch – Chain
Sc – Single crochet
He’s – Half double crochet
Dc – Double crochet
TL – Third Loop
2DCTog – 2 double crochet together
3DCTog – 3 double crochet together
Crochet Slouchy Hat – Happy Heart – Detailed Instructions
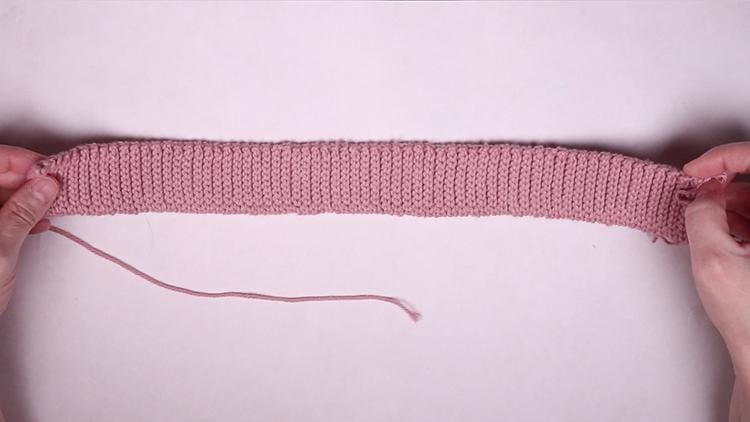
Brim of the Hat (Ribbed Slip Stitch)
1. We’re going to start by chaining 11.
2. Starting with the second chain from the hook, slip stitch down the chain. When you get to the end, chain 1 and turn your work. (Note: the loop on the hook does not count as a chain).
3. From now on, we’re going to slip stitch into the back loop of every stitch in the row. At the end of each row, chain 1 and turn your work.
Sizing Notes: You’ll want to make rows of slip stitches in multiples of 6 for this pattern.
Make sure you measure the circumference of your head. Keep that number handy, because You’ll need to know how many rows of slipstitches to make for the brim of your hat. You’ll want to make enough rows of back loop slip stitchesto be about 2-3 inches shorter than your head measurement since this is a very stretchy stitch.
Like I said, the ribbed slip stitch is a very stretchy crochet stitch, but it’s also a very small stitch, so it may take more rows than you’re used to be the length you want. For my hat I made 132 rows, but this is because I like my hats roomy. In hindsight, I wish I’d made it just a tad bit smaller. If I made one again, I would probably make only 126 rows.
4. When you’ve finished making rows, fold your brim in half and slip stitch down the side. Slip stitch in every loop of each side to join the two halves together.
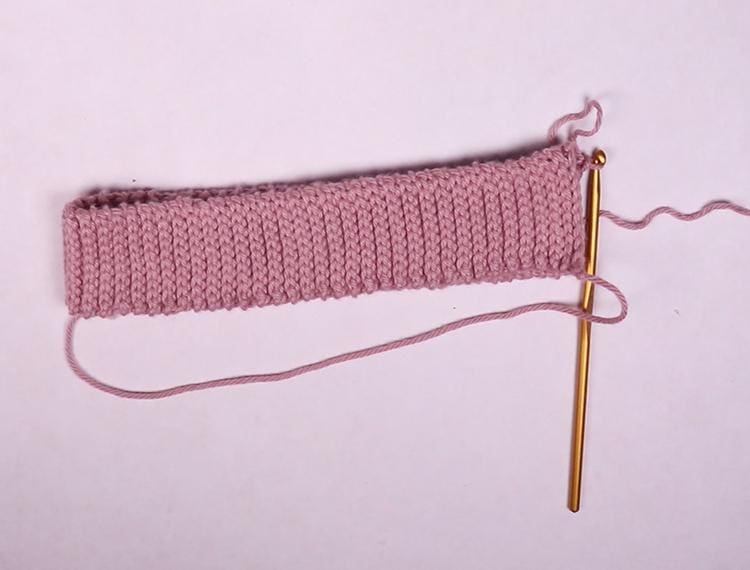
The body of the Hat
1. When you finish your last slip stitch on the hat brim, chain 2. This will count as your first half double crochet.
2. For the first round, half double crochet at the top of every row on the brim.
Please note that you should have the same number of half double crochets as you have rows (which will be a multiple of 6). Once you get to the end, slip stitch into the first loop and chain 2.
3. For this round, we will be working in the third loop of each half double crochet in the previous round. This is going to make a lovely stitch that stands out as a row of sideways “v”s to give the hat a decorative texture.
Make a half double crochet into every third loop in this round. When you get to the end, slip stitch into the first loop and chain 1.
4. We’re going to continue, with another row of stand out “v’s” but this time, we’re going to make a single crochet into every third loop in the round. When you get to the end of this round, loop in the white color as you make your slip stitch to join the round and chain 2 (this will count as the first double crochet for our first heart).
5. It’s time to make our hearts!
Make a 2DCTog in that very same chain 2 stitch you just made. Chain 2, then make a 3DCTog into that very same stitch. Then chain 3.
2DCTog – 2 double crochet together stitch Instructions – This is basically making 2 double crochets half way then finishing them together in one swoosh.
Yarn over, insert your hook, pull the yarn through, yarn over, pull through 2. You should have 2 loops on your hook.
Yarn over, insert your hook into the same space, pull the yarn through. Yarn over pull through 2. You should have 3 loops on your hook.
Yarn over, pull through all 3. The 3DCTog stitch is made exactly like this only you make 3 double crochets instead of 2.
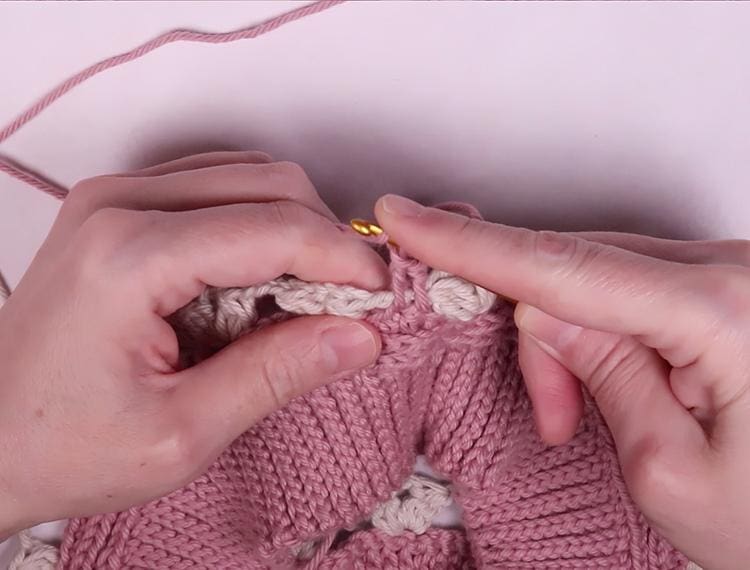
6. Skip 5 stitches and in the 6th stitch, 3DCtog, Ch 2, 3DCtog, Ch 3.
Repeat this pattern until the end of the round. At the end of the round you should end with a chain 3.

7. Slip stitch into the first heart, loop in the pink color again, and chain 2.
8. Single crochet into the top of the first heart and chain 2.
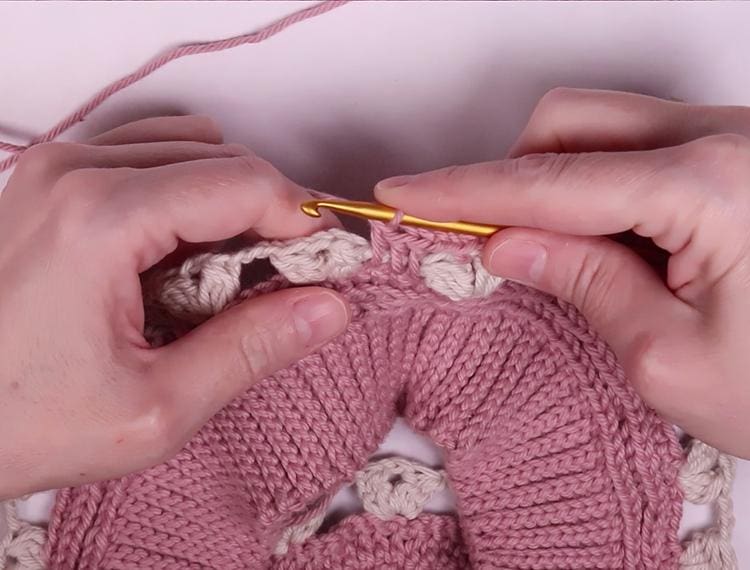
If you look at the last row of pink stitches you made down below the white chain of three between the hearts, you’ll see that there are 5 stitches in between the hearts. We are going to double crochet in the 3 middle spaces.
So, yarn over, Insert your hook into the 2nd stitch in that pink row between the hearts and work your first double crochet. You will automatically be incasing the white chain in the double crochet.
Work a double crochet in the next two pink stitches (now you have three double crochets between the hearts). Then chain 2.
Sc into the top of the next heart, ch 2, dc into the middle three pink stitches below the white chain, ch2. Repeat this pattern for the rest of the round. slip stitch at the end to join the rounds and ch 2
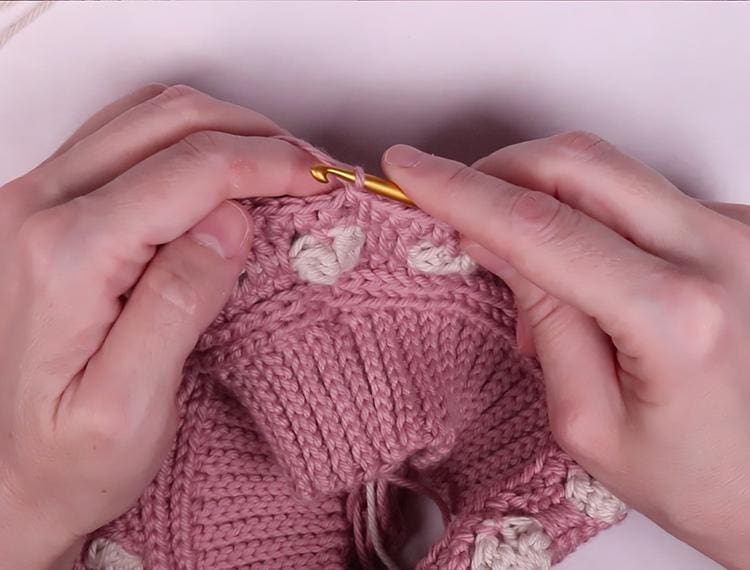
9. Next we’re going to make a half double crochet (hdc) in the chain space above one side of the heart, hdc in the sc in the center of the heart, and hdc in the chain space above the second part of the heart.
Then, hdc in each dc from the previous round.
Basically it works out to: 3 hdc’s in above each heart and 3 hdc’s between each heart.
Repeat this pattern until the end of the round. slip stitch at the end and ch 2.
11. Hdc in the third loop in every stitch in this round. slip stitch at the end and ch 1.
12. sc into the third loop in every stitch in this round. Slip stitch at the end and chain 2.
13. Repeat steps 5-12
14. Repeat steps 5 through 9
Now we’re going to begin decreasing to make the round pattern on the back of the hat.
15. HDC into the third loop of the next 10 stitches, HDC decrease in the next 2 stitches. Repeat until the end of the round. Slip stitch to close the round and chain 2.
16. HDC into the third loop of the next 9 stitches, HDC decrease in the next 2 stitches. Repeat until the end of the round. Slip stitch to close the round and chain 2.
17. We won’t be working into the third loop in this round. We’re going to make a normal HDC into the next 8 stitches, and HDC decrease in the next 2 stitches. Repeat until the end of the round. Slip stitch to close the round and chain 2.
18. HDC into the third loop of the next 7 stitches, HDC decrease in the next 2 stitches. Repeat until the end of the round. Slip stitch to close the round and chain 2.
19. HDC into the third loop of the next 6 stitches, HDC decrease in the next 2 stitches. Repeat until the end of the round. Slip stitch to close the round and chain 2.
20. This is another normal stitch row. Do not work into the third loop for this row.
HDC into the next 5 stitches, HDC decrease in the next 2 stitches. Repeat until the end of the round. Slip stitch to close the round and chain 2.
21. HDC into the third loop of the next 4 stitches, HDC decrease in the next 2 stitches. Repeat until the end of the round. Slip stitch to close the round and chain 2.
22. HDC into the third loop of the next 3 stitches, HDC decrease in the next 2 stitches. Repeat until the end of the round. Slip stitch to close the round and chain 2.
23. HDC into the next 2 (normal) stitches, HDC decrease in the next 2 stitches. Repeat until the end of the round. Slip stitch to close the round and chain 2.
24. HDC into the next 10 stitches, HDC decrease in the next 2 stitches. Repeat until the end of the round. Slip stitch to close the round and chain 2.
25. HDC decrease into every stitch and continue working without slip stitching until the top of the hat is closed.
26. Fasten off and work all the yarn ends into your work.
Crochet Slouchy Hat – Happy Heart – Condensed Instructions
Brim of the Hat (Ribbed Slip Stitch)
1. Ch 11
2. Starting with the 2nd from the hook, ss down the chain, ch 1 and turn your work.
3. Ss into the Bl of every stitch, ch 1 and turn your work. Continue this pattern until you have the desired length for your hat.
Sizing Notes: You’ll want to make rows of slip stitches in multiples of 6 for this pattern.
Make sure you measure the circumference of your head. Keep that number handy, because You’ll need to know how many rows of slipstitches to make for the brim of your hat. You’ll want to make enough rows of back loop slip stitchesto be about 2-3 inches shorter than your head measurement since this is a very stretchy stitch.
Like I said, the ribbed slip stitch is a very stretchy crochet stitch, but it’s also a very small stitch, so it may take more rows than you’re used to be the length you want. For my hat I made 132 rows, but this is because I like my hats roomy. In hindsight, I wish I’d made it just a tad bit smaller. If I made one again, I would probably make only 126 rows.
4. When you’ve finished making rows, fold your brim in half and slip stitch down the side. Slip stitch in every loop of each side to join the two halves together.
The body of the Hat
1. When you finish your last slip stitch on the hat brim, chain 2. This will count as your first half double crochet.
2. Turn your work sideways so that you are working on top of the hat brim. HDC in every stitch, ss into the first stitch and chain 2.
Please note that you should have the same number of half double crochets as you have rows (which will be a multiple of 6).
3. HDC into the third loop of every stitch in this round. When you get to the end ss and ch 1.
4. Sc into the third loop of every stitch. At the end of the round, ss into the next stitch and loop in white color then ch 2.
5. 2DCTog in the same ch 2 space. Ch 2 then 3DCtog into the same space. Repeat this pattern until the end of the round. Then ss into the next stitch work in the pink color and ch 3.
6. Skip 5 stitches and in the 6th stitch, 3DCtog, Ch 2, 3DCtog, Ch 3.
Repeat this pattern until the end of the round. At the end of the round you should end with a ch 3.
7. Ss into the first heart, loop in the pink color again, and ch 2.
8. Sc into the top of the first heart and ch 2. Dc into the 3 middle pink stitches between the hearts. Repeat the pattern ch 2, sc, ch 2, skip one stitch in the row below the hearts and DC into 3 stitches until the end of the round then ch 2.
9. Next we’re going to make a half double crochet (hdc) in the chain space above one side of the heart, hdc in the sc in the center of the heart, and hdc in the chain space above the second part of the heart.
Then, hdc in each dc from the previous round.
Basically it works out to: 3 hdc’s in above each heart and 3 hdc’s between each heart.
Repeat this pattern until the end of the round. slip stitch at the end and ch 2.
11. Hdc in the third loop in every stitch in this round. slip stitch at the end and ch 1.
12. sc into the third loop in every stitch in this round. Slip stitch at the end and chain 2.
13. Repeat steps 5-12
14. Repeat steps 5 through 9
Now we’re going to begin decreasing to make the round pattern on the back of the hat.
15. HDC into the third loop of the next 10 stitches, HDC decrease in the next 2 stitches. Repeat until the end of the round. Slip stitch to close the round and chain 2.
16. HDC into the third loop of the next 9 stitches, HDC decrease in the next 2 stitches. Repeat until the end of the round. Slip stitch to close the round and chain 2.
17. We won’t be working into the third loop in this round. We’re going to make a normal HDC into the next 8 stitches, and HDC decrease in the next 2 stitches. Repeat until the end of the round. Slip stitch to close the round and chain 2.
18. HDC into the third loop of the next 7 stitches, HDC decrease in the next 2 stitches. Repeat until the end of the round. Slip stitch to close the round and chain 2.
19. HDC into the third loop of the next 6 stitches, HDC decrease in the next 2 stitches. Repeat until the end of the round. Slip stitch to close the round and chain 2.
20. This is another normal stitch row. Do not work into the third loop for this row.
HDC into the next 5 stitches, HDC decrease in the next 2 stitches. Repeat until the end of the round. Slip stitch to close the round and chain 2.
21. HDC into the third loop of the next 4 stitches, HDC decrease in the next 2 stitches. Repeat until the end of the round. Slip stitch to close the round and chain 2.
22. HDC into the third loop of the next 3 stitches, HDC decrease in the next 2 stitches. Repeat until the end of the round. Slip stitch to close the round and chain 2.
23. HDC into the next 2 (normal) stitches, HDC decrease in the next 2 stitches. Repeat until the end of the round. Slip stitch to close the round and chain 2.
24. HDC into the next 10 stitches, HDC decrease in the next 2 stitches. Repeat until the end of the round. Slip stitch to close the round and chain 2.
25. HDC decrease into every stitch and continue working without slip stitching until the top of the hat is closed.
26. Fasten off and work all the yarn ends into your work.


