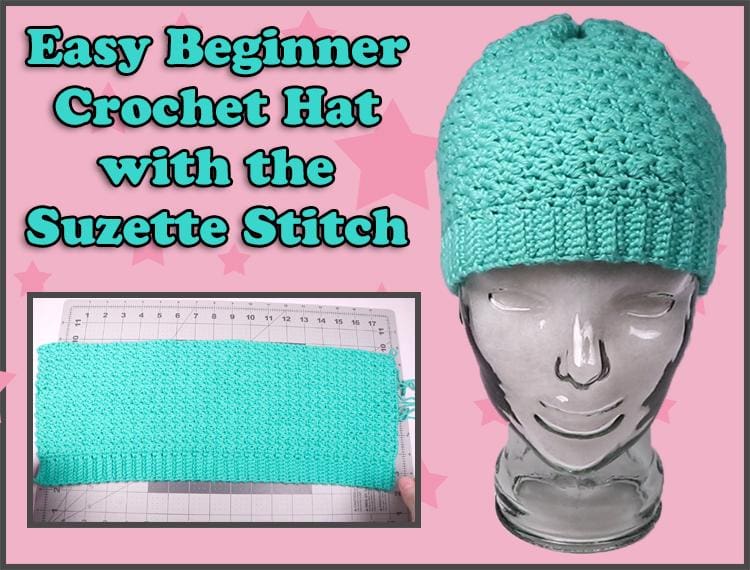
This is an easy beginner crochet beanie with a cute little ridged brim. It’s basically made by making a rectangle and slip stitching up the back instead of being crocheted in the round, since rectangles are much easier to make for a crochet beginner.
Even though the suzette stitch is simple, it adds beautiful texture and looks more complex than it actually is. It’s really just a combination of single crochet and double crochet in one stitch skipping every other stitch. See? It’s simple.
If you’re a beginner you may be intimidated by making a brim for a hat. Don’t be. It’s only single crochet in the back loops. Nothing to be intimidated by. But, if you aren’t ready to make a hat with a brim and you’d like to make an absolute beginner hat, you can check out my “pattern for My “Easiest Crochet Hat for Beginners” pattern or my “Easiest Crochet Cat Ear Hat” pattern.
Alright, enough talk, let’s get started.
For this pattern you will need:
- 1 skein of #4 worsted weight yarn. I used Hobby Lobby “I Love this Cotton” in the color “Aspyn”. This skein had 180 yards and I used the whole ball. If you want to make a bigger hat you’ll need another ball. You can also use acrylic or wool yarn if you prefer.
- H/8 5 mm crochet hook
- Scissors
- Yarn needle for weaving the yarn ends into your work and cinching the hat at the top in the end.
Crochet Stitches Used in this Pattern (US Terms):
Sc – Single Crochet
Sc-Blo – Single Crochet Back loop only
Dc – Double Crochet
Sl St – Slip Stitch
Note: The Suzette Stitch is one single crochet and one double crochet into every other stitch.
Easy Beginner Crochet Beanie Using the Suzette Stitch Pattern
1. Chain 8.
2. Starting from the second chain from the loop (we do not count the loop on the hook), single crochet down the chain. You should have a row of 7 crochet stitches that you will be working in for the remainder of the hat brim. Chain 1 and turn your work.
3. Starting with the first stitch, single crochet in the back loop only down the row. Chain 1 and turn your work for 72 rows.
Note: This makes for a snug adult beanie. But, if you want the hat to be looser, this is where you will add more rows. If you want this hat to be smaller around you’ll want to make less rows.
Make sure to make rows in multiples of 2 for this pattern.
When sizing, it’s best to make enough rows to fit around your head comfortably but just a tad bit snug, the hat will stretch out as you wear it.
4. Once you’ve made as many rows as you need, chain 1 and then begin making single crochets in every stitch and turn stitch across the top. You should have 72 single crochets across the top once you reach the end. Chain 1 and turn your work.
5. Now we’ll start making the Suzette stitch. In the first stitch make a single crochet and then in that same first stitch make a double crochet. Skip the next stitch and then make a single crochet and double crochet in the next stitch. You’ll be working down the row making a single crochet and a double crochet in every other stitch down the row. Until you reach the last stitch.
6. In the last stitch of every row make 1 single crochet, chain 1 and turn your work.
A little note here: If you try adding a single crochet and a double crochet in that last chain stitch, you won’t have a nice rectangle. The edges will bulge in a wavy pattern. That’s why we always just add one single crochet and then chain one. Your Suzette stitch will look much neater.
7. You’ll want to make 26 rows of the Suzette stitch.
Note: Add more rows of the Suzette stitch to make your hat bigger (or slouchy). Subtract rows to make it smaller.
8. Once you’ve made all your rows, you’ll have a rectangle. Fold your rectangle in half and slip stitch up the side. Then Fasten off and work the yarn into your work.
9. To close up the top of the hat, use your yarn needle and a long piece of yarn to weave in and out of the top stitches. Then pull the yarn tight, knot it and then weave the yarn back and forth across the top hole then weave some of the yarn into your work. Cut then end and you’re done!
10. You can add a pom pom or leave it without one.
Watch the full tutorial for this pattern down below. You can also watch the Left handed version of this video here.


